Balsa Glider Kit and Plan Set for Indoor Flying
While designing Prototype #2 of our F1D, we were motivated to see if we could scale down the size and make a hand launch glider. The hope is to offer a balsa glider kit or balsa wood glider designs set from this effort, or at a minimum, let the reader download the balsa glider plans to experiment themselves. Because such a design would be extremely delicate, the idea would be to launch it indoors, from a decent height, by gently letting it go! There will be no plans to do a ‘traditional’ throw of this indoor free flight model!
There are a few facts about Indoor Free Flight Modeling which should be acknowledged up front. First, this category of the Flying Hobbies has been around for a long time and is fading in popularity. Probably because there are no electronics involved! Second, building one of these is equal parts Art and Skill! Consequently, it is both difficult to find information and recommendations on how to start. This Mini-D is just perfect because it introduces you to just a few of the basic skills needed for these balsa wood glider designs or balsa wood glider kits.
Critical to moving on to F1L or even to the F1D (mentioned above) models is the need to master cutting templates, cutting balsa at a small scale and learning to use Ultra-film. This Mini-D Balsa Glider Plans design will introduce the builder to these skills, without adding confusion and stress of everything a propeller brings to the game!
UPDATE: Initially, this was only to be a glider, but with so much indoor time due to the Covid-19 Shelter In Place orders, a prop, motor stick and tail boom was added. Finish pictures and video only are provided, along with the additional notes page. For additional build instructions on these balsa glider kits, reference the EZB build.
Introducing The Mini-D Design
Simple math led us to the following dimensions for our first version, which we have nicknamed the Mini-D.
- Wing span = 250mm
- Wing chord = 90mm
- Stab span = 200mm
- Stab chord = 60mm
- Fin width = 45mm
- Fin height = 35mm
Bill of Materials:
- Qty 1 – 1/32″ x 3″ x 24″ Sheet Balsa
- Qty 1 – 1/8th” x 1/4″ Stick Balsa (only needs approx 6″)
- Partial Roll – Ultra Film:
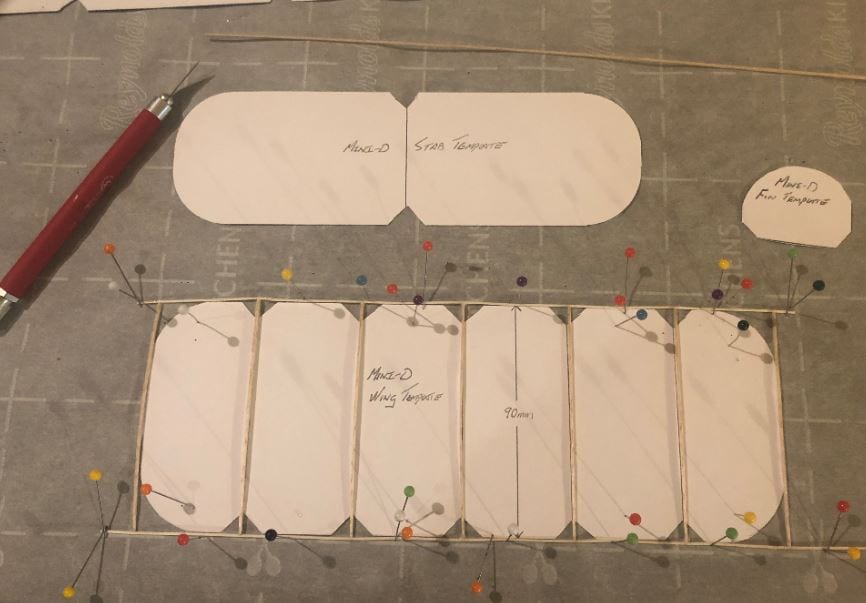
Here is Revision 1 of the Wing Template, Stab / Fin Template and Top Level Assembly Drawing. For best results, print the two templates out on Card Stock Paper.
Building Steps
As mentioned, building these ultralite indoor free flight models is 50% Art and 50% Skill. There is no single rule book to follow, but there is 1 rule to follow. It Is: Practice Patience! The first documented balsa wood glider designs build we did is on the XYZ-EZB. It is a great step by step and a fantastic reference for this build, except you get to skip most of it.
One more important note: this author cannot stress the importance of a proper build/cutting mat, magnifying eye-wear, sharp xacto knives, straight edges and glue applicators. If you are use to building RC Airplane Kits and not these fragile and small balsa glider kits, you will find it to be completely different! What was once easily handled, seen, glued and cut now becomes a challenge worthy of bragging rights! It cannot be done without the tools and aides. Here are some of our recommendations.
Here in quick text and pictures, is the order followed on this Mini-D.
Cut out the Templates: Cut out the Wing Template, Stab Template, Fin Template and Arc Rib Template, after printing them on Card Stock paper. Take your time! IMPORTANT: once these are cut-out, make sure you cut a notch everywhere a glue dot will be applied. if you do not, you will glue balsa to card stock! Balsa Glider Kits purchased from the large providers make it easy….but building from these templates make it rewarding!
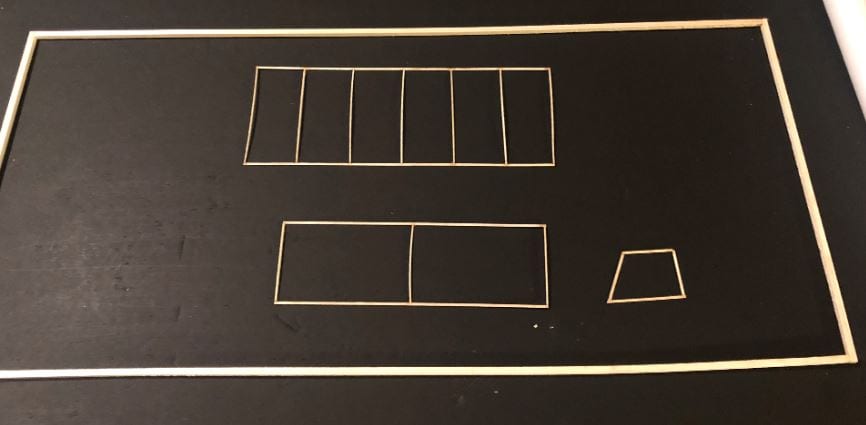
Cut the Leading and Trailing Edges: Cut strips of 1/32″ by 2/32″ by 24″. If you are brave, attempt to cut a simple square stick of 1/32″. This takes practice and patience!!
Cut the Ribs: Using the Arc Rib Template, cut 8 to 10 ribs from the 1/32″ sheet. Each Rib should be approximately 2/32″ thick. This too takes practice. Learn to go very slowly and take several passes per rib, even though it is only 1/32″ you are cutting through. The magnifying headset eye-wear comes in very handy here!
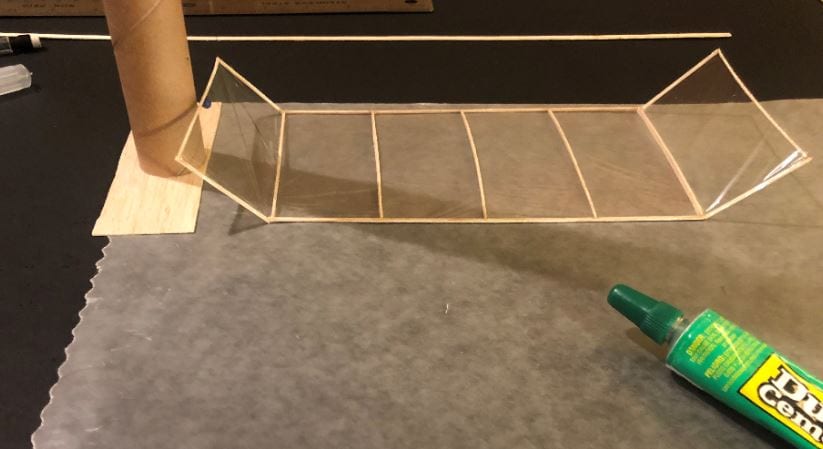
Build up the Stabilizer, Fin and Wing: using the strips of balsa stick you cut and the ribs, build each assembly up. You will cut the ribs to fit. These pictures show the building process occurring on top of 3/4″ foam board, purchased at Hobby Lobby, with Wax Paper underneath the templates. Medium CA is used to glue each joint.
Cover the surfaces: Here is another step which takes a lot of practice! The best tutorial we have found is here, on YouTube. Please watch it several times, practice on some dummy stick frames, and then give it a try! You will need the 3M-77 spray recommended in the tools section above.
A Side note on covering. We have found that final trimming of excess is easiest with the surface upside down (if applicable) and plenty of excess is on each side. Slow and steady is the name of the game here!
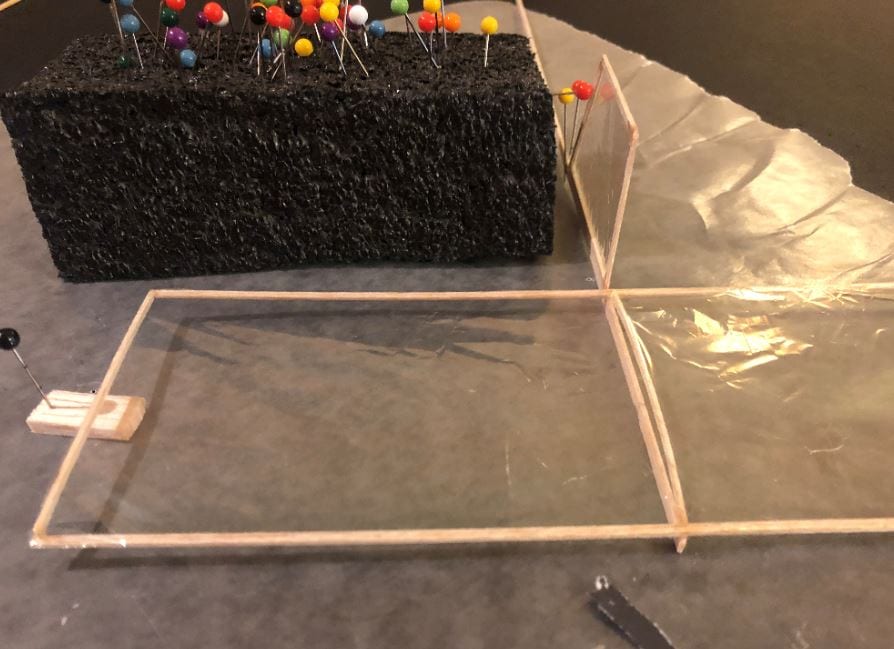
Add Dihedral: take a look at the top level drawing. It shows a 25mm dihedral on each wing tip, at the second rib from the end. To do this, build up a jig of scrap parts which can gently hold the wing tip up that high. Turn the wing over and cut 3/4’s through the leading and trailing edges in front of the rib. Gently flip the wing over and using your hands, gently break the joint at the two locations. When ready to set, place a drop of glue in each joint and set it in the jig. Allow glue to completely dry and then repeat on the other side.
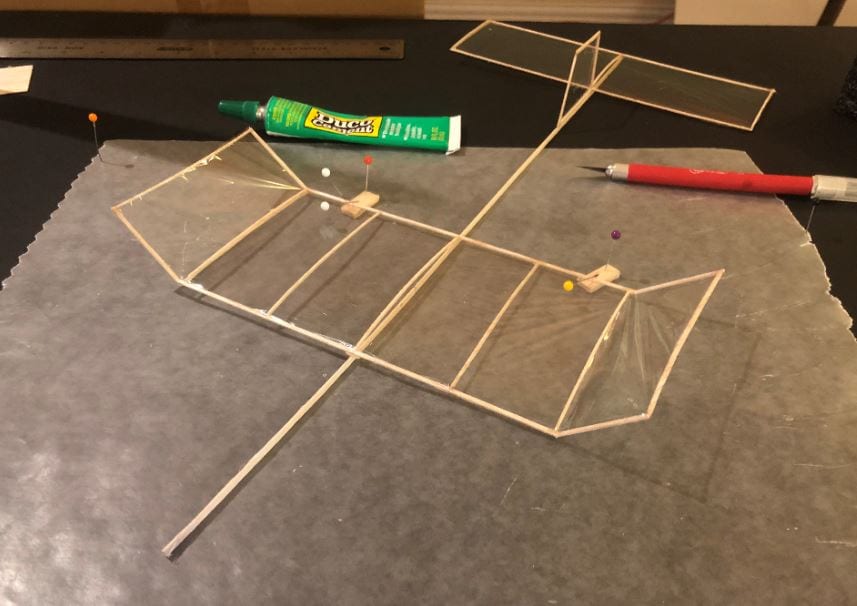
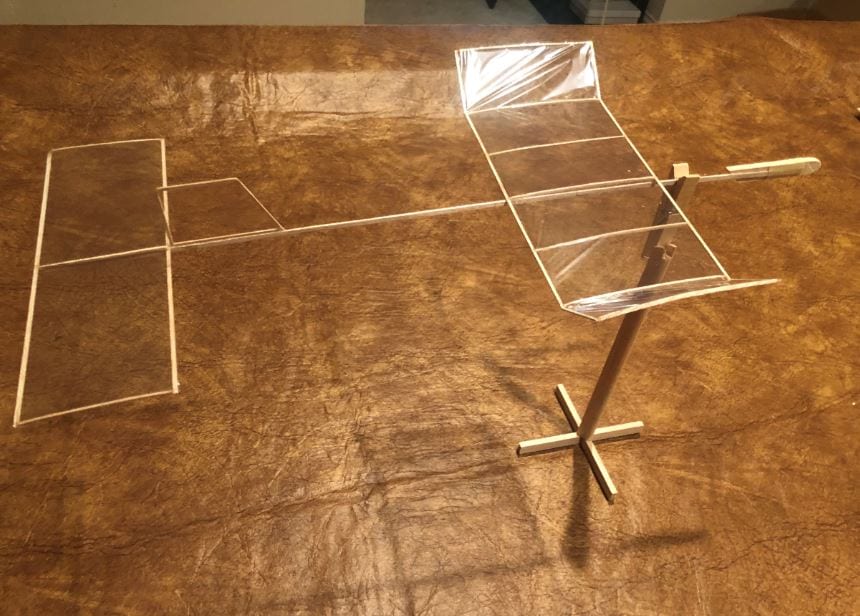
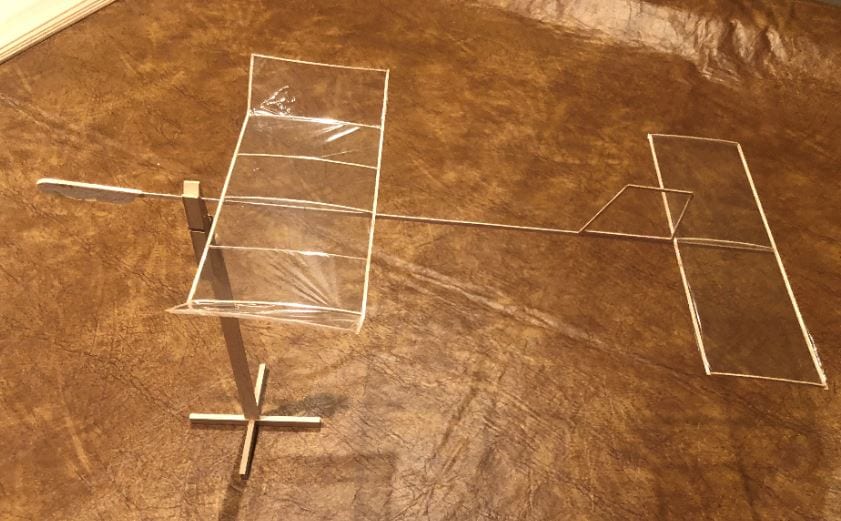
The Fuselage-Stab and Fin: from here, it is very straight forward. Referencing the Top Level balsa glider plans drawing linked above, cut from a 1/32″ sheet a 3mm by 420mm strip. Secure this strip on your building board and attach both the stabilizer and then the fin, using a very small amount of glue. Here is a close up photo showing one method. Note: the stabilizer is propped up with scrap balsa and the Pin Pad is being used to gently hold the vertical fin up.
The Fuselage-Wing: Time to add the wing to this Indoor Flyer. First, add a small shim, cut from 1/16″ scrap, per the top level drawing. Then, place the assembled wing onto the fuselage, with the leading edge sitting on the shim. The below pictures shows the wing resting on leading edge shim and also some scrap balsa holding up the trailing edges evenly. Anytime the wing shows up on balsa glider kits, you know you are getting close!
The Nose: lastly, from a 1/8″ x 1/4″ stick, cut a 2″ section. Sand and Round one end and then use this piece to final balance your model. You will attach it via masking tape, so you can move it easily. You can see from the Top Level drawing an approximate spot for the CG.
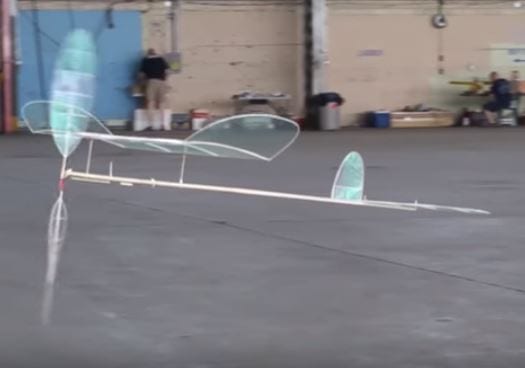
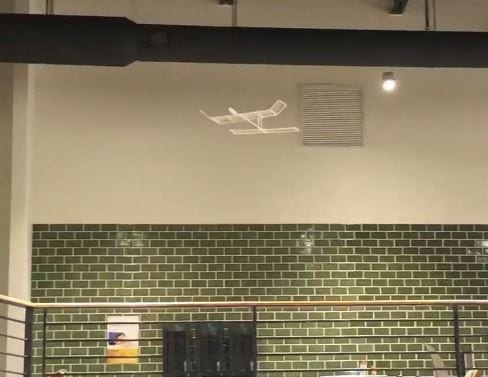
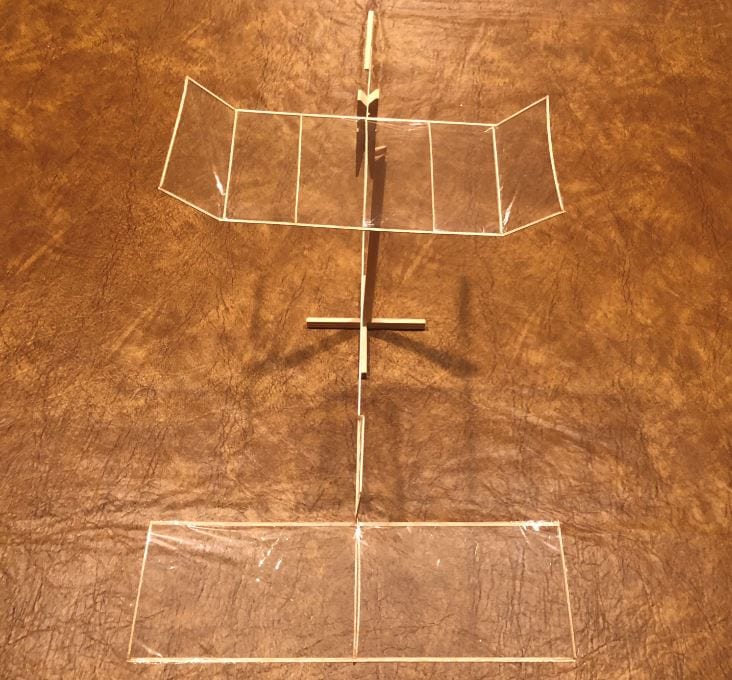
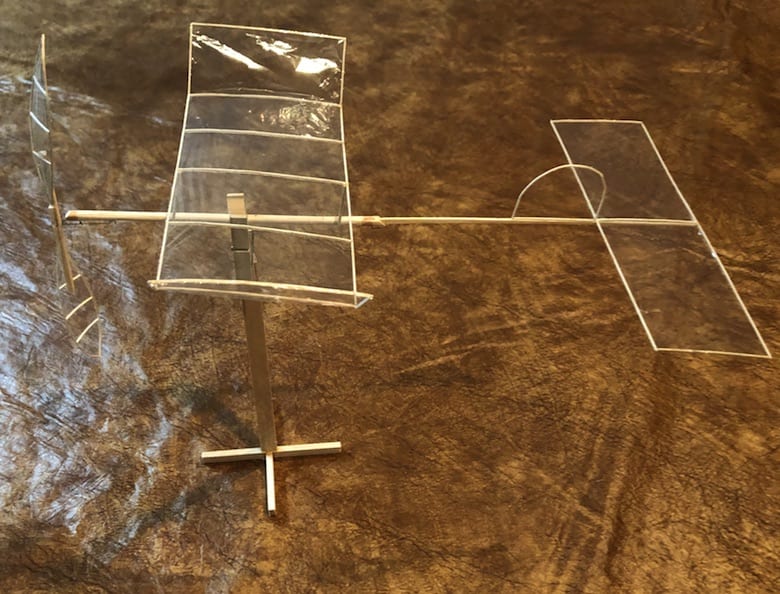
The Final Model: Here are a few pictures of the final model. Enjoy the build and Have Fun! Remember, with these Balsa Glider Plans you can now build either an Indoor Glider or an actual Mini-F1D.
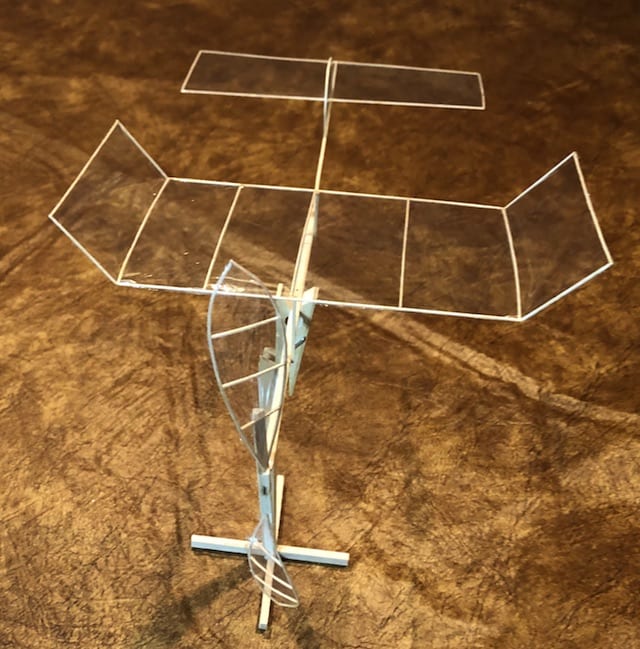
The Mini-D w/ Motor. AKA a MINI-F1D!
As mentioned above, we decided to continue with this effort and see if we could scale a prop, motor stick and tail-boom and get it to fly. We did! Now, you can build a glider, or a Mini F1D! Unfortunately, we don’t have enough indoor room during this Shelter-In-Place to get some good flight times. We will though, very soon! So, here are a few pictures and video of the latest with this balsa wood glider designs. Side note: building one of these Mini-D balsa glider kits and then watching it fly is extremely rewarding!

You can click all through-out our site and see we are crazy for Indoor Free Flight Activity. Interested in Getting Started? Follow this link!