If It Can Fly’s F1L-EZB Indoor Free Flight Design and Build
Step by Step build of the XYZ-EZB
Background: over a couple of months, the goal was to design and build an Indoor Free Flight Model that could meet specification and be entered into local contests if so desired. Many resources were reviewed and over 10 prototype models were designed and built to both master the build techniques along with understanding the flying characteristics of the F1L-EZB. This page is the culmination of the design and build for this particular class of Indoor Free Flight Model. This, by no means, suggests that an expertise has been obtained in the tweaking of the design and mastering the requirements of long flight time, however this model can serve as a stepping point into the Indoor Free Flight Hobby! Enjoy and Happy Flying!
Naming Convention: The XYZ-EZB allows for many variants of this F1L model to be built and as such, requires a naming convention which will accommodate. The XYZ portion of the name will allow for such, while the EZB simply states it is a F1L design.
Naming Convention: [XYZ – EZB] [Wing Type, Stabilizer, Fin – EZB]
Wing :
- First Letter Wing [V]: Dihedral to Center
- First Letter [H]: 2nd-Rib Tip-Up. Flat Middle, High Tip Dihedral.
- First Letter [L]: 1st-Rib Tip-Up. Flat Middle, Low Tip Dihedral.
Stabilizer:
- 2nd Letter [A]: 2″ x 7″ Rectangle
- 2nd Letter [B]: 2.5″ x 10″ Rectangle
Fin:
- 3rd Letter [U]: Standard Fin, Positioned Up
- 3rd Letter: [D]: Standard Fin, Positioned Down
- 3rd Letter: [M]: Double Arrow Middle Mount Fin
Drawings and Templates for our version of an F1L-EZB
Material List:
- Qty (2) 1/32″ x 3″ x 12″ Balsa Sheet
- Qty (1) 1/8″ x 3″ x 12″ Balsa Sheet
- Qty (1) 1/16″ x 1/16″ x 12″ Balsa Stick
- Qty (1) 1/8″ x 1/8″ x 12″ Balsa Stick
- 8″ x 8″ Gift Wrapping Tissue Paper
- 6″ of 0.015 Piano Wire
- Qty (1) F1L-EZB/F1D Bearing
- Qty (1) Roll of Ultrafilm
- Qty (4) Small O-Rings
- 40″ of 1/16″ Tan Super Sport Rubber
Building Tools: Just a reminder, here is a partial list of tools and supplies used. If you looking for something specific and cannot find it, please contact us and ask. Here to help!
Building The Wing of this Indoor Free Flight Model
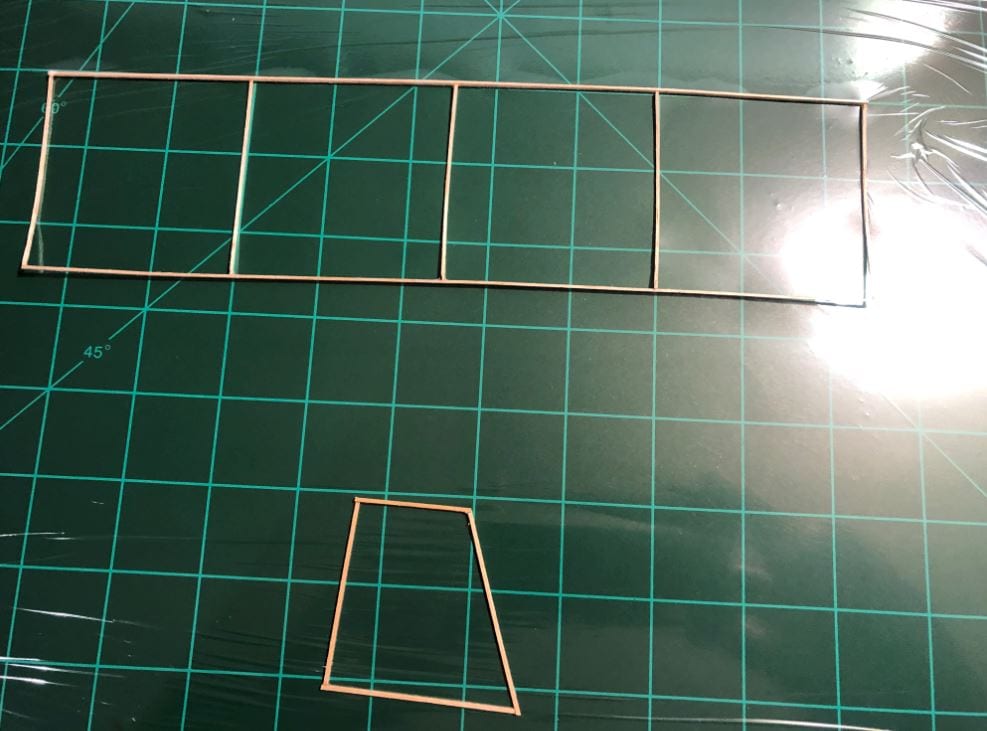
Cutting Out Wing Templates
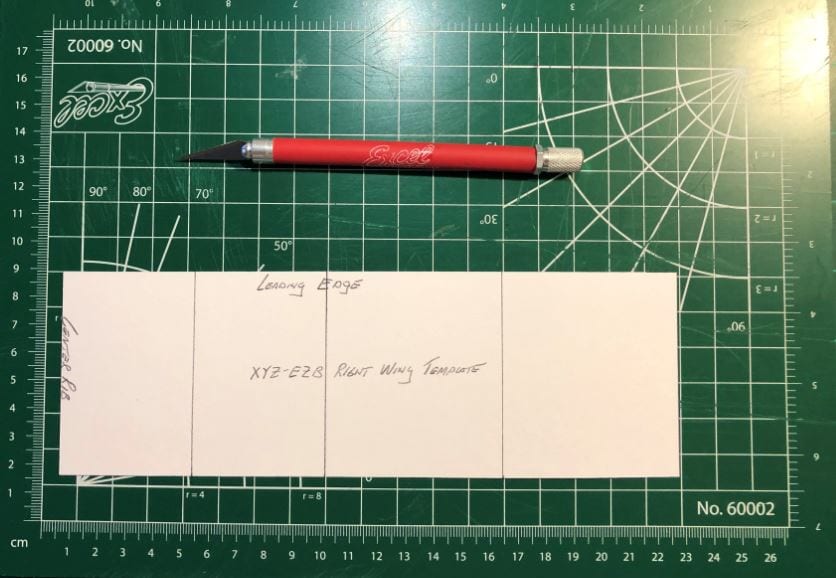
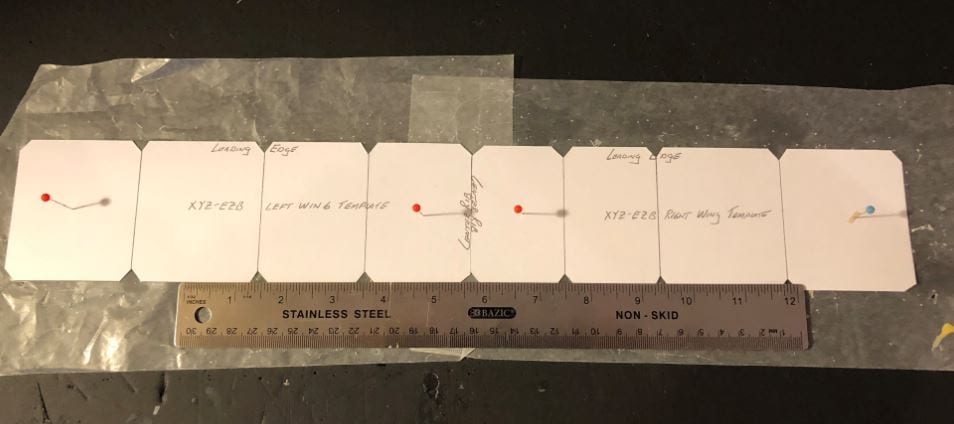
From Standard 8.5″ x 11″ Card Stock, print out template “XYZ-EZB-Left Wing Template.pdf” and setup on a cutting board, similar to what is shown here:
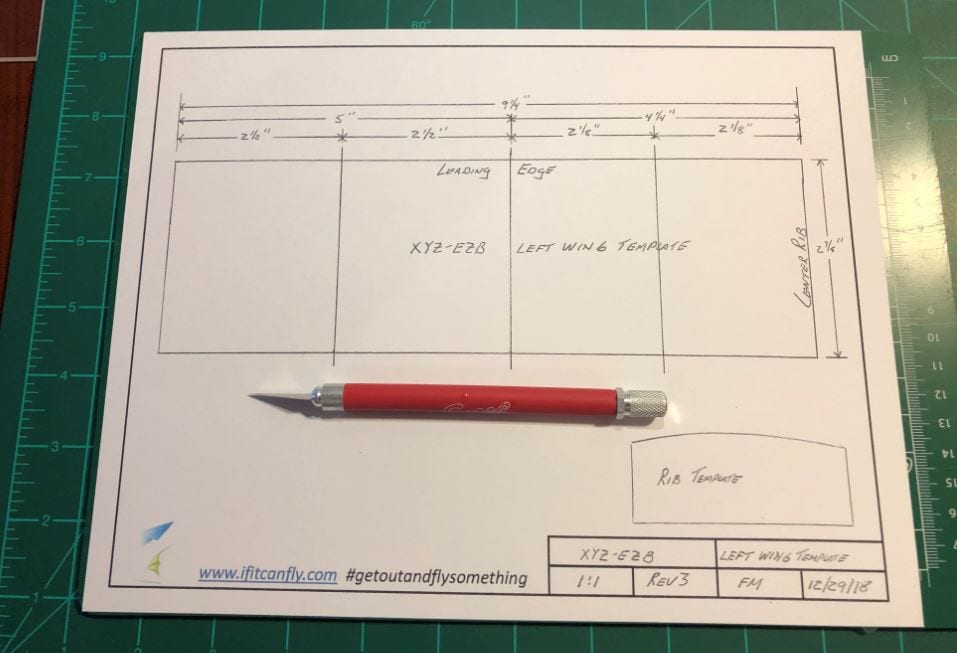
Carefully cut out the Left Wing Template and the Rib Template. You may discard the remaining portion, keeping both templates.
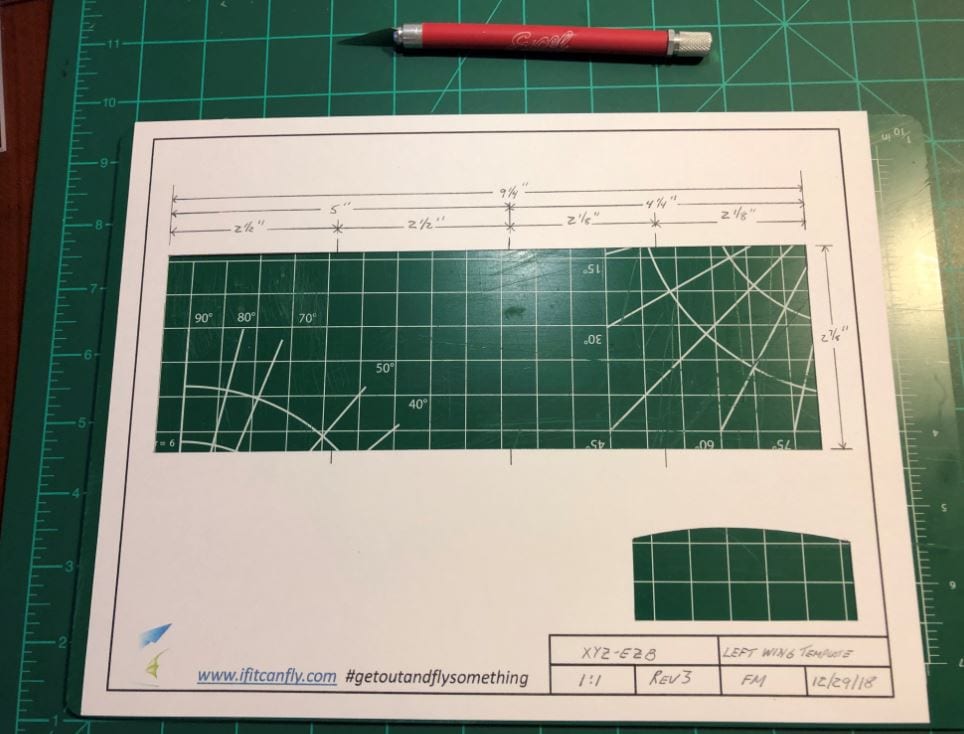

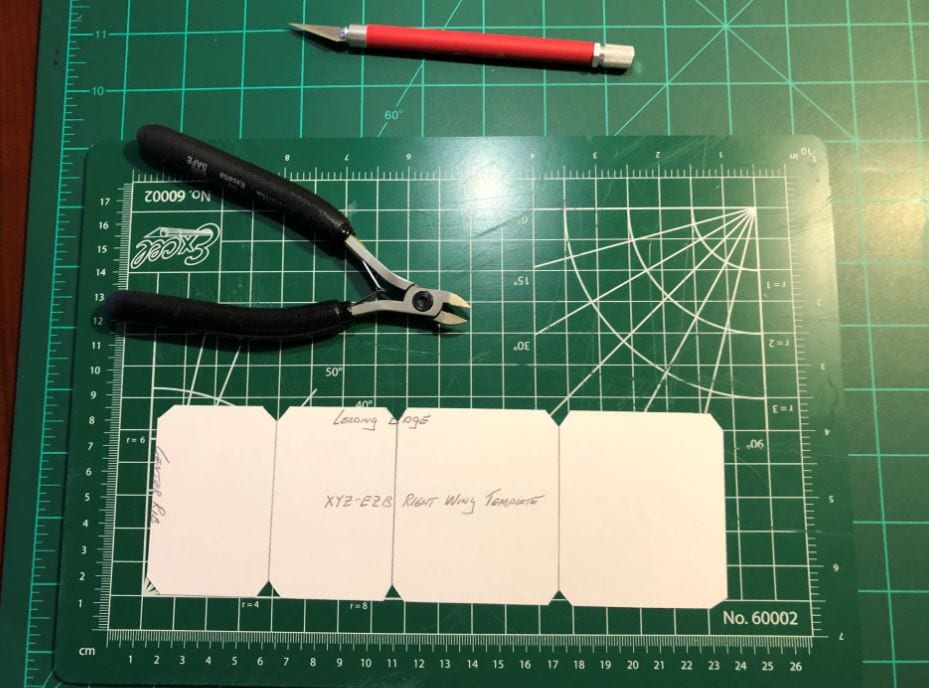
Using wire cutters or blade, remove the corners and cut a “V” where each rib will meet the edge. (see picture). This keeps you from accidentally gluing the template to the ribs and edges.
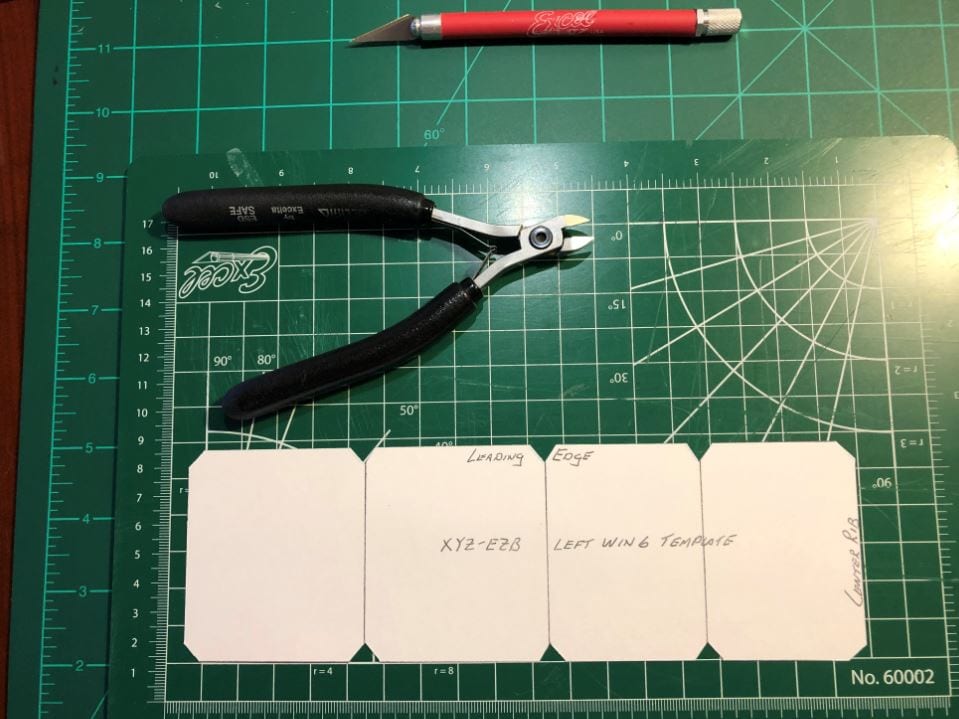
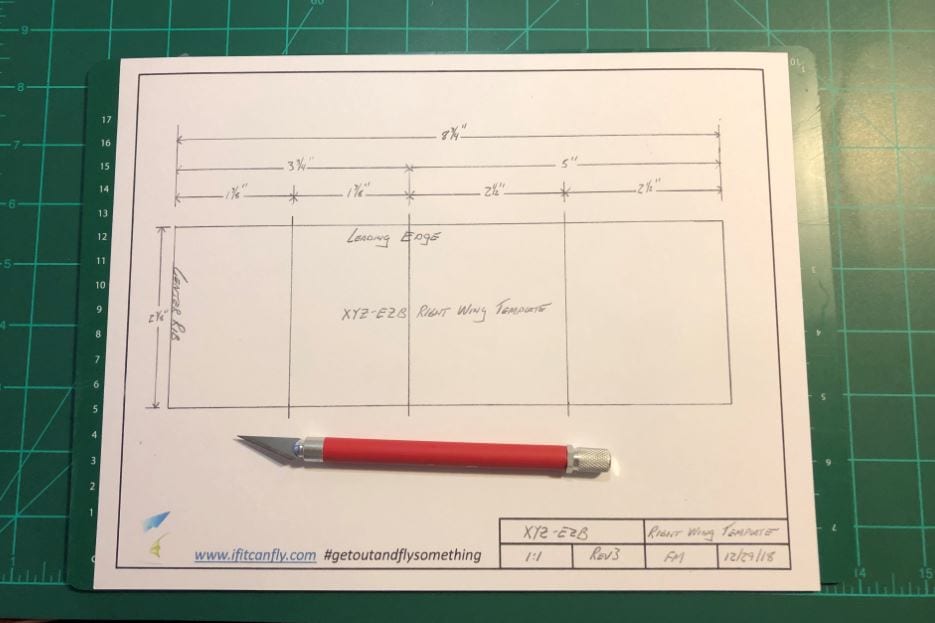
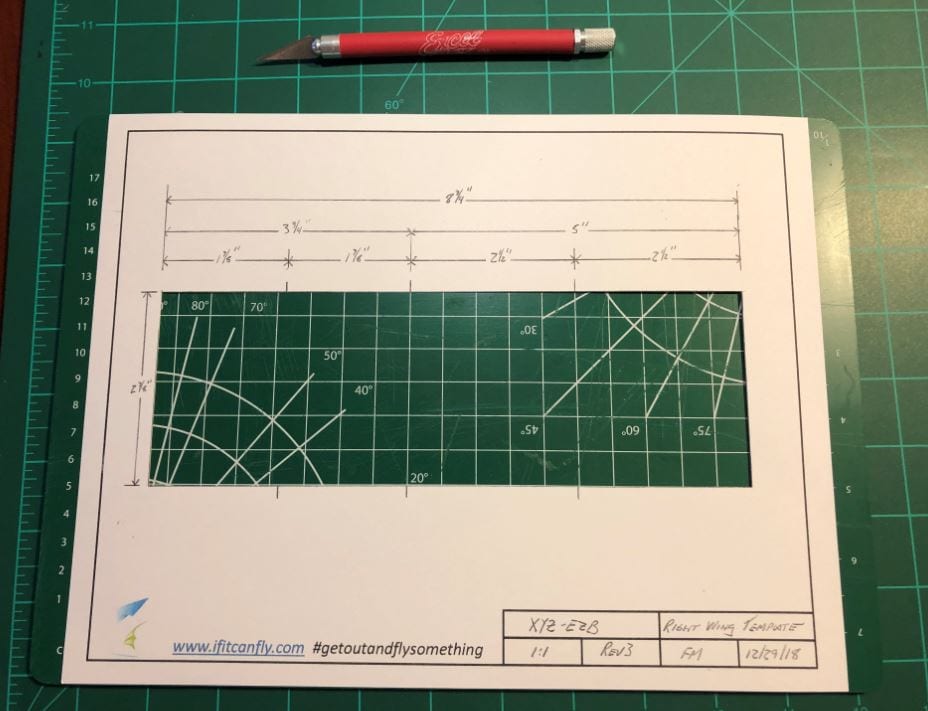
Repeat the above sequence for the Right Wing Template. (Note: only the Left Wing Template has the Rib Template cutout).
Building The Wing Frame
Practice, Practice, Practice! If there is one piece of advice to be given before building, it would be to practice! Building an Indoor Free Flight Model is all about building the lightest possible model, which it is very very delicate! Practice cutting very small balsa, practice gluing with the smallest drops of glue, practice using whichever visual aide you will use to see through, etc. Practice using only one hand because using two will end with broken balsa!
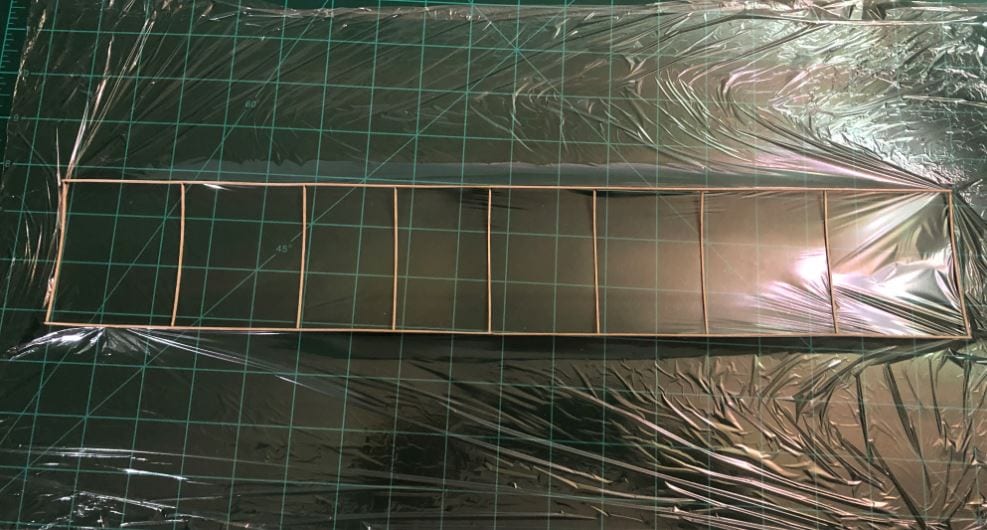
The Wing Frame consists of two main components, the outside frame and the ribs. To get started, cut the ribs first and then the leading edge / trailing edges.
Ribs & Edges:
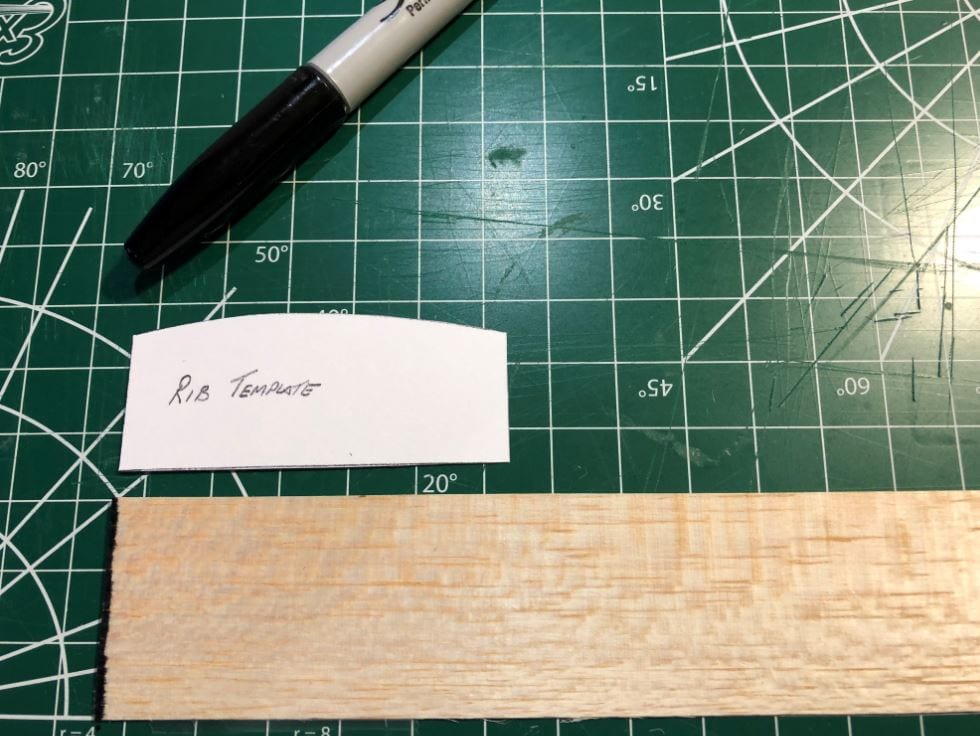
- Tape a small section of the 1/32″ sheet onto your cutting board, just big enough for the Rib Template to have extra around it. Take a look at the picture below. It shows a Sharpie Mark drawn down the leading edge side. This is done as a personal preference to know, later during assembly, which end is the leading edge.
- Position Rib Template on balsa and cut 15 ribs, at approx 1/32″ height. 9 ribs will be used on the wing, so set aside the others for the stabilizer and an extra. NOTE: Slow and Steady is the name of the game in cutting these, do not go fast AND if you damage any, throw them away and re-cut. They are to thin and will break if under any stress once covered.
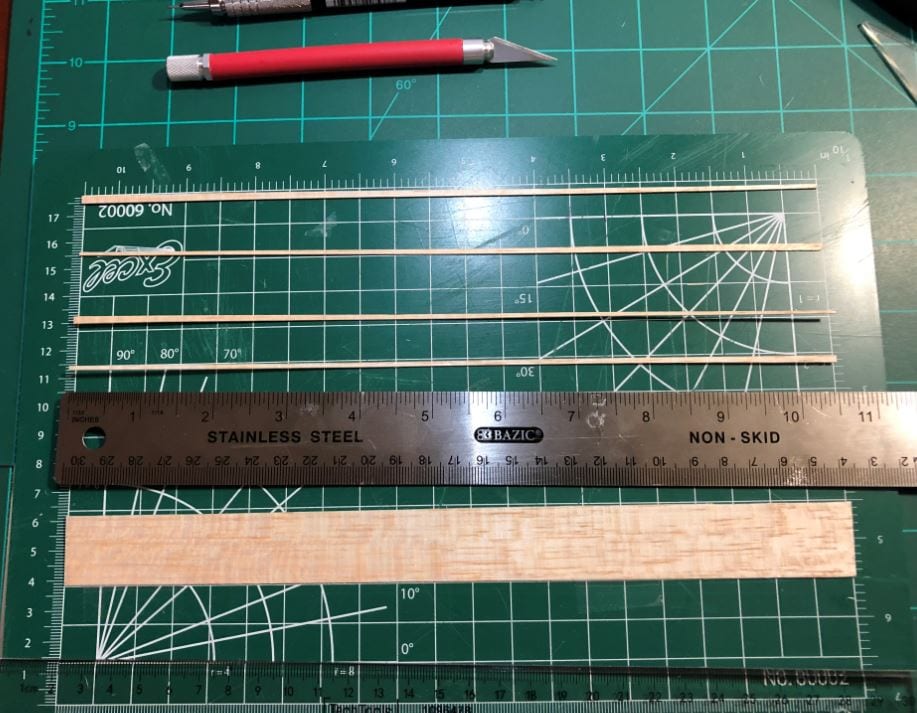
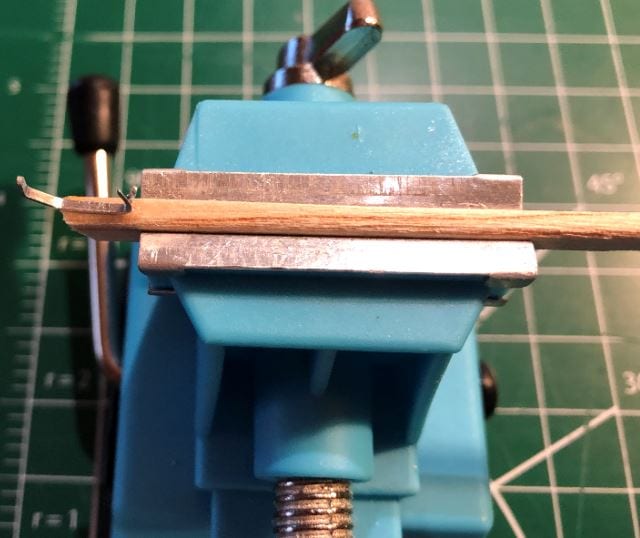
- Beginner Edges: if this is your first time to build this model or any model as delicate, it is recommended the outside leading and trailing edges are from stock, 1/16″ x 1/16″ x 10 1/2″.
- Optional Advanced Edges: From a 1/32″ x 2″ x 10 1/2″ sheet, taped to your cutting board, you will cut 4 outside edge strips. They will taper from 1/16″ to 1/32″. (the photo below shows these cut edges).
- For Stabilizer and Fin: Cut a qty of six (6) 1/32″ x 1/32″ x 10 1/2 balsa sticks and set them aside.

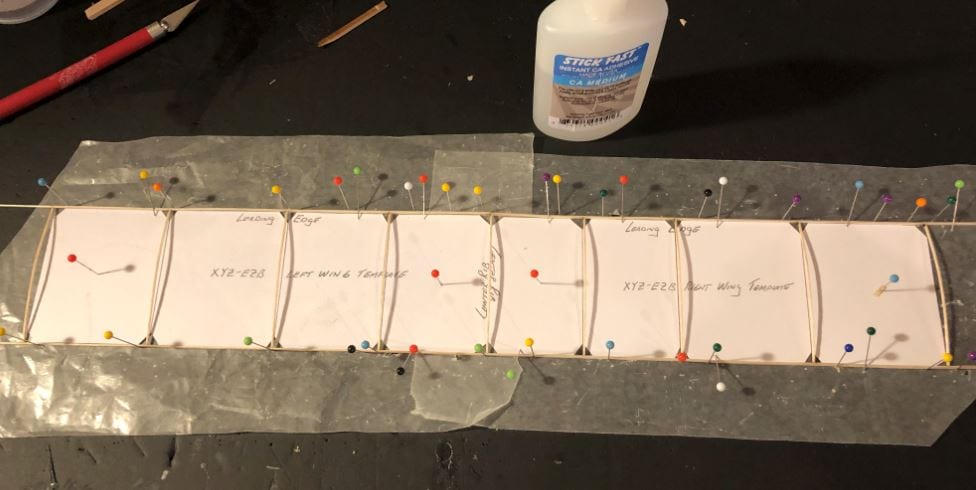
Assemble Around The Wing Template
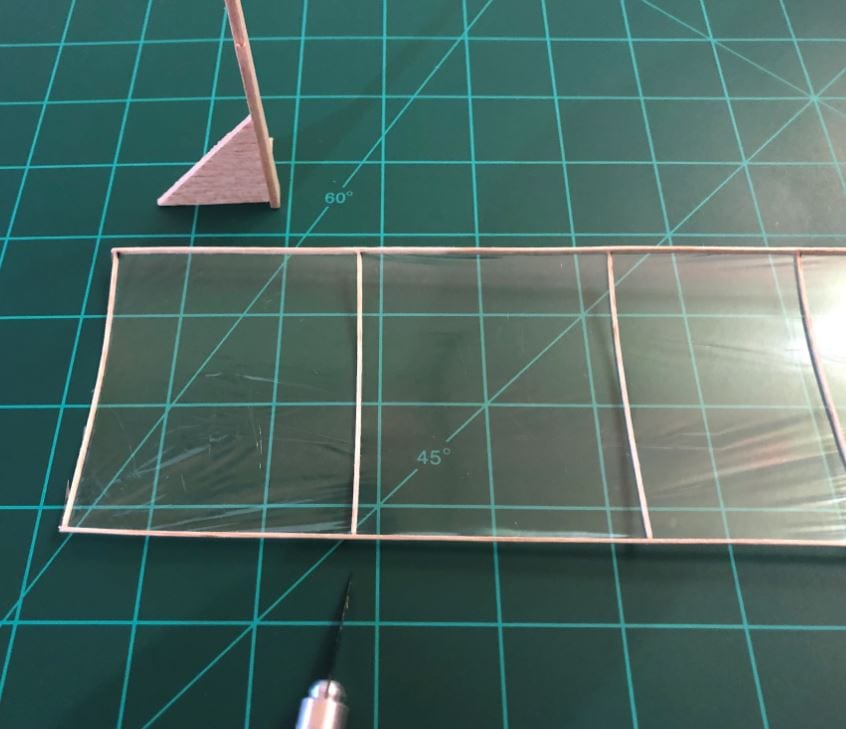
The wing is built flat with no dihedral and then covered flat as well. This process helps keep the covering challenges to a minimum. Dihedral, based on the wing variant desired, is added after covering.
- with both wing templates cut out, place them on your building board, underneath wax paper and make sure the leading edge and trailing edges of each line up with each other. Use a straight edge, as shown in the picture below, to insure they are lined up. Secure them with push-pins.
- build leading edge and trailing edge with either the 1/16″ x 1/16″ (beginner) or the tapered 1/16″ x 1/32″ (advanced). If you are using the tapered edges, the 1/16″ goes to the center and it tapers out to the tip to 1/32″. (SPECIAL NOTE: NEVER secure balsa to plan / template by pushing pins through the balsa. Though it is acceptable for bigger models, for these you cannot. It weakens the area and it will break! ALWAYS secure by pushing the balsa up against the template w/ the push pin)
- Carefully add ribs until all have been placed. Ribs are longer so each can be trimmed for the perfect fit. Trim each rib from the trailing edge side. Take your time here and be as careful as possible! Place a small drop of glue (medium CA used) at each contact point / joint.
- After wing is built and prior to removing from template, trim excess corners off flush.
- Remove from template carefully and set aside.
Building The Stabilizer and Fin of this F1L-EZB
Build both the Stabilizer and Fin following the exact same process as the Wing, with obvious and minor differences:
- Stab and Fin are both single pieces
- Much smaller than the wing
- is built flat and will remain flat. No dihedral added later.
- The Frames of both the Stabilizer and Fin are built up with 1/32″ x 1/32″ balsa stick cut from the 1/32″ x 3″ sheet
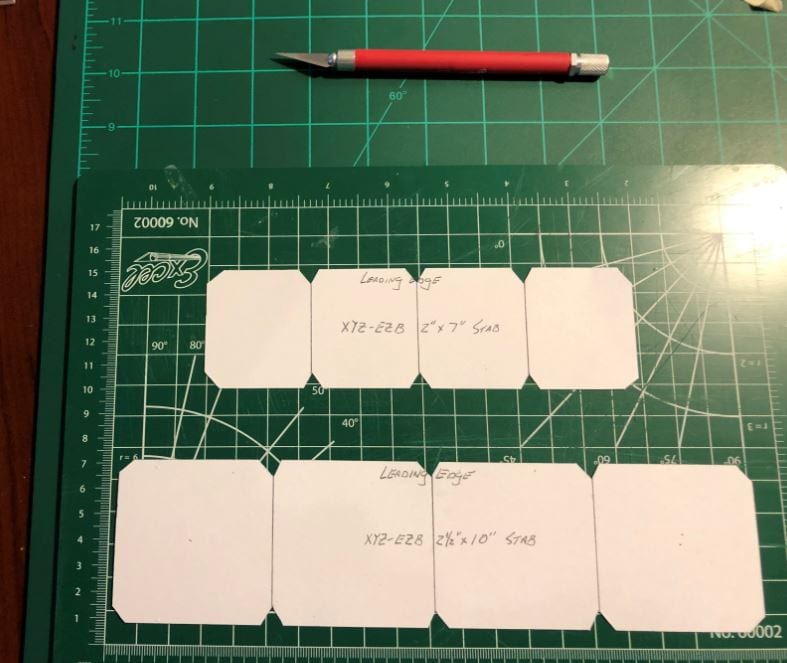
Decision on which Stabilizer and Fin to cut out for this F1L-EZB: there are two different templates for both the stabilizer and the fin. The purpose is to give the builder a few different options to experiment with.
- Stab: both the 2″ x 7″ and the 2 1/2″ x 10″ will fly great. The later will come in a bit heavier and will require the wing alignment to CG a bit father towards the tail. It is recommended you build the smaller one first. Note: same rule of trimming the ribs applies on the stab, trim the trailing edges for fit.
- Fin: the two fin types actually allow for 3 different setups. The Up/Down Fin can be mounted vertically up on the tail boom, or vertically down. The Arrow Fin is designed as a mid fin, 1/2 above the tail boom and 1/2 below. Recommendations to start, build the Up / Down Fin and later, mount it vertically up.
Here are pictures of the templates after cutting them out.
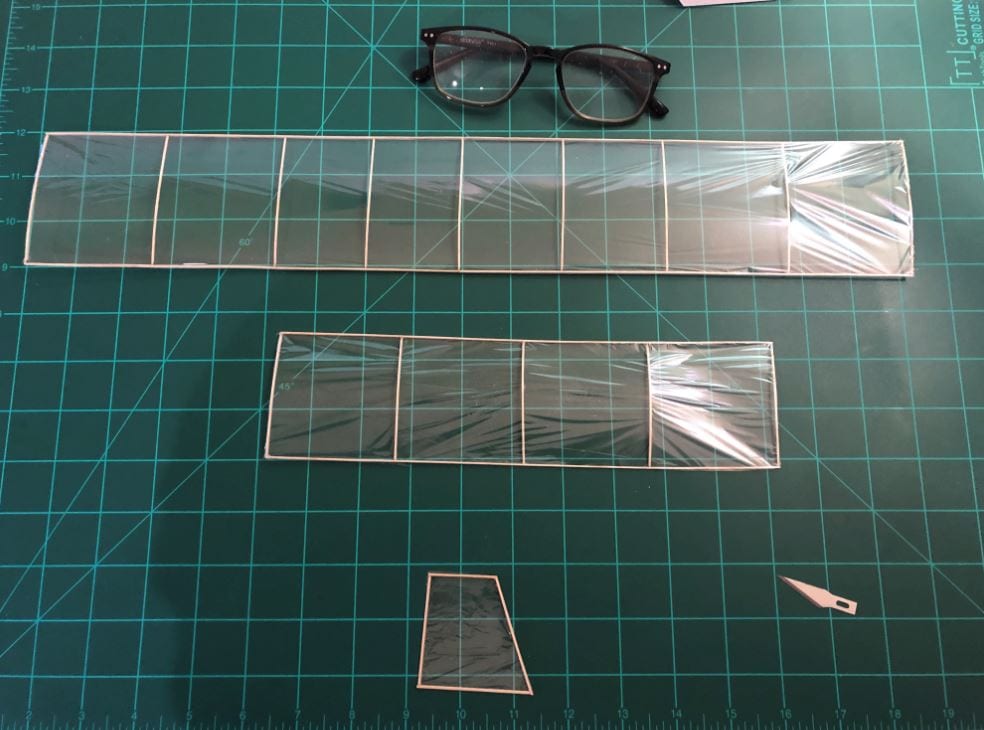
Cover the Wing, Stab and Fin of this Indoor Free Flight Model
Ready, Set, Cover! If it was only that simple. There are many techniques and Google may be your best friend here. Below is a video showing the method used to build the models described in these instructions.
Here are a few pictures of coverings before and after trimming.
Finishing The Wing for this F1L-EZB
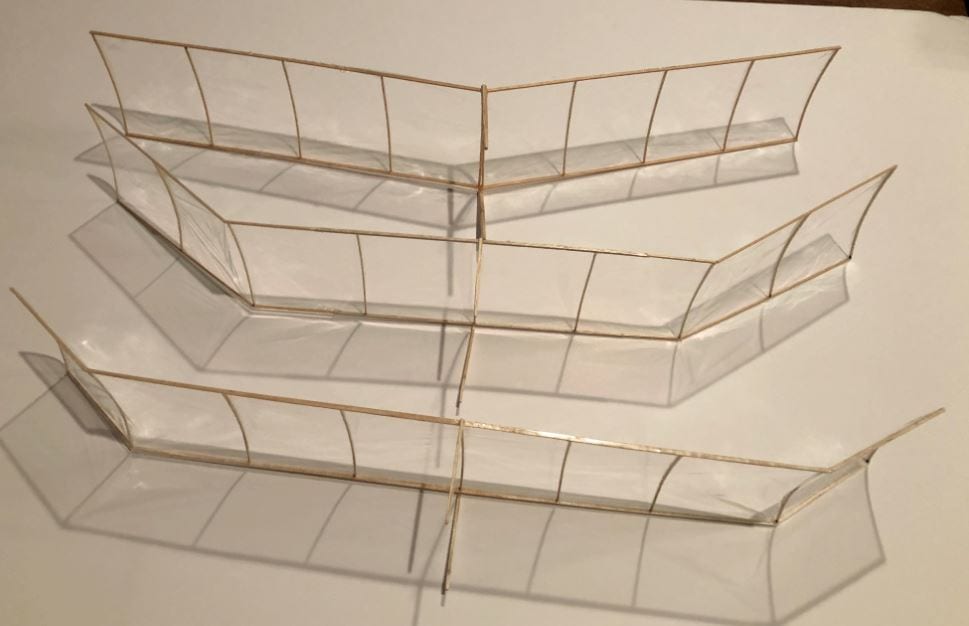
Time to pick the type of wing dihedral you desire. Listed next are the 3 options and a few notes to help you decide. In brackets [ ] are the letter used in the naming convention:
- V-Wing[V]: this is the simplest to build, because it requires only one modification to the flat wing, and is the most stable of the 3 options.
- 2nd-Rib Tip-Up[H]: this requires two modifications to the flat wing, one at each end of the wing. It is adding dihedral at the 2nd Rib from the end.
- 1st-Rib Tip-Up[L]: this requires two modification to the flat wing, similar to above 2nd-Rib Tip-Up. The only difference is it occurs at the first rib.
Just a reminder, the Left Wing Panel is 1/2″ longer than the right panel.
In this picture, all three wing types are shown, and in the same order as the bullets listed above:
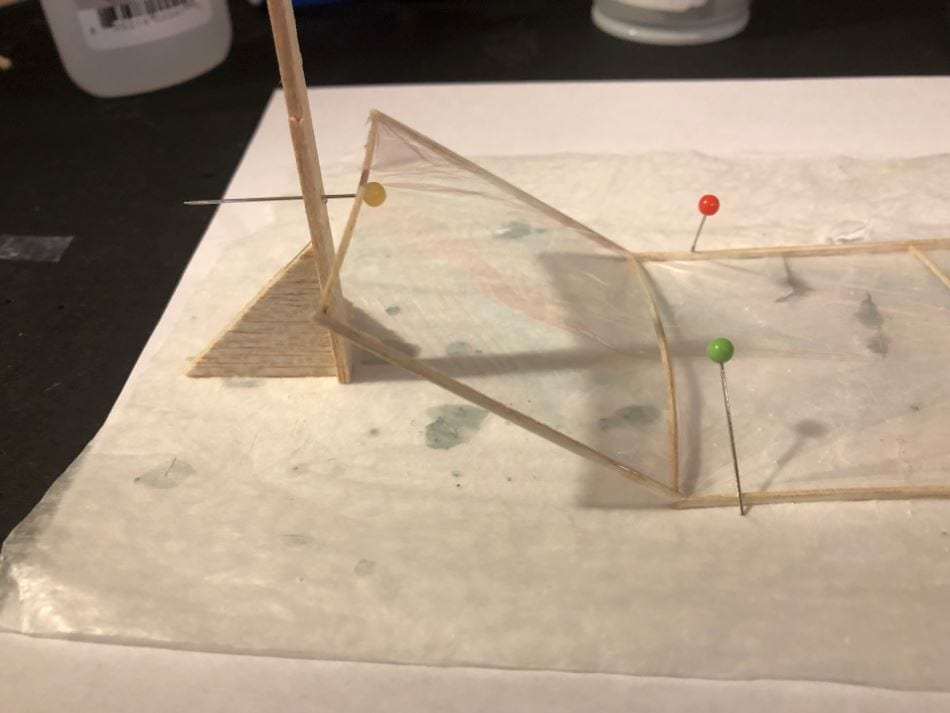
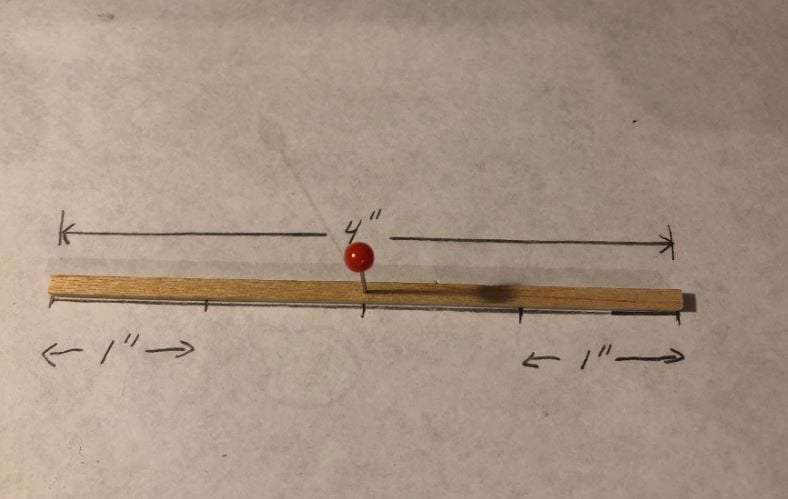
Referencing the XYZ-EZB Wing Drawing, select the wing type with the desired dihedral. Build Up a Dihedral Gauge from scrap balsa that stands on its own and is at least 4 inches high. (see picture. note, pin is used to set height, which is mentioned in the next steps)
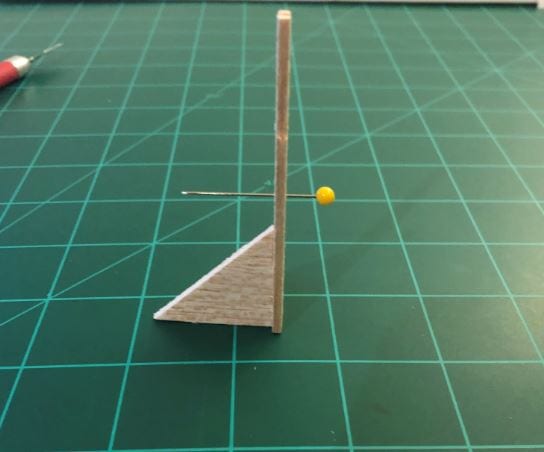
With Wing Upside, locate the rib where you will make a slight cut in both the Leading Edge and Trailing Edge. This cut will be just enough to allow the Wing to fold up. You will perform this task once if the V-Wing and twice for the other two wings. Note: Set the dihedral gauge to the proper height for your wing type, by placing a pin at the appropriate height, before proceeding.
- If you are building the V-Wing, you will cut the two edges on the left side of the center rib.
- If you are building the 2nd-Rib Tip-Up Wing, you will cut at the 2nd Rib from the end, on the inside of the rib, closet to the center.
- If you are building the 1st-Rib Tip-Up Wing, you will cut at the 1st Rib from the end, on the inside of the rib, closet to the center. (see picture below with blade pointing to upside down wing, near rib that will be where both the leading and trailing edges are cut.)
- READ THIS BEFORE EXECUTING: With the dihedral gauge set and the work surface cleared of obstructions so you can quickly and gently flip the wing: place a drop of glue in the new cut area on each edge, turn the wing over, place the wing tip on the pin set at the appropriate height, and allow to dry. (see picture below showing the 1st-Rib Tip-Up Wing set in dihedral gauge, drying)
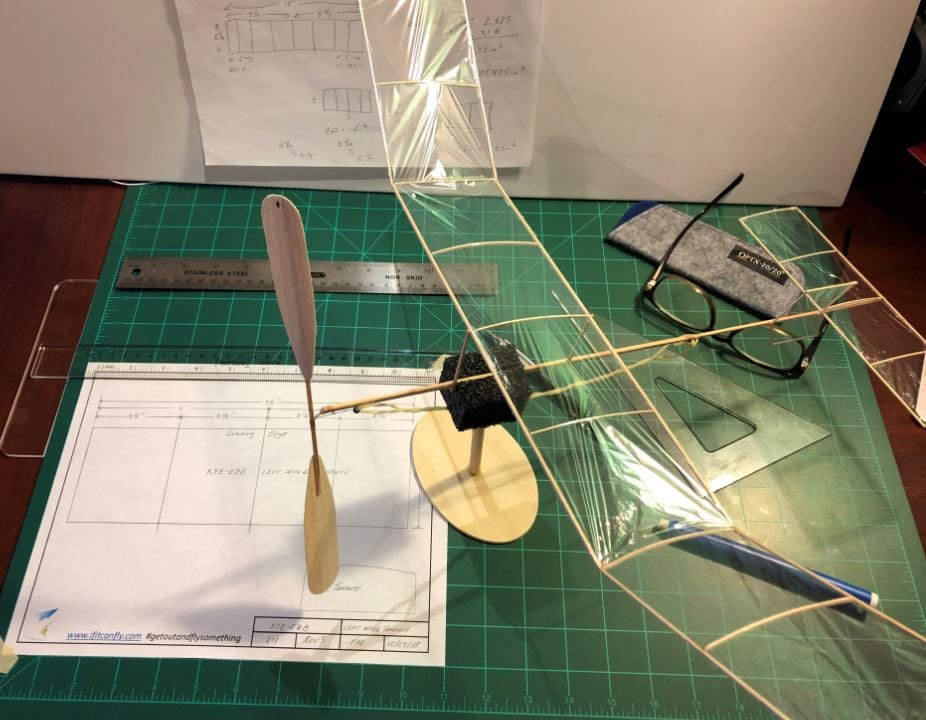
Adding the Wing Posts.
The wing posts are the 1/16″ x 1/16″ balsa sticks that support and hold the wing to the motor stick (aka fuselage). They are glued to the wings at the center location, on both the leading edge and the trailing edge. On the motor stick side, they are fitted into small hand-made tubes which are glued on the motor stick itself. These next steps will show the process of getting the posts on the wing easily and the build-up of the post tubes, in preparation for final assembly after the motor stick and tail boom are built.
- Cut two wing posts from 1/16″ by 1/16″ balsa stick. Note, this stick should be fairly stiff in nature. The lengths for these sticks are: front = 2″ and read = 1 3/4″.
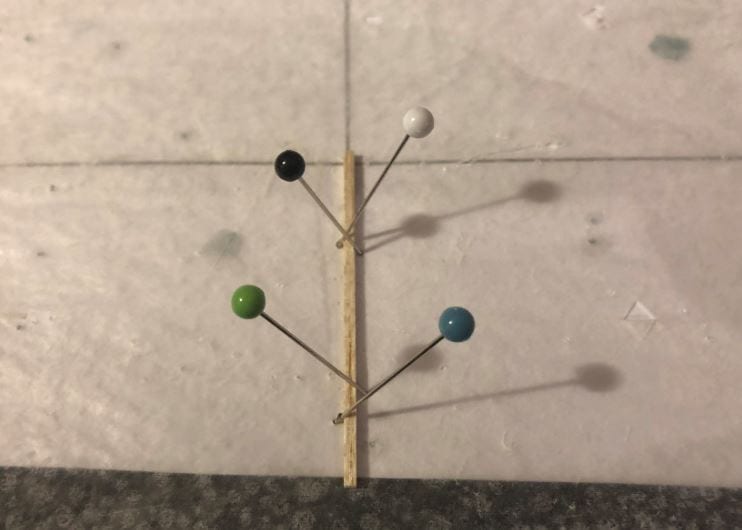
- Print out Cross Pattern For Wing Drawingand place it on your building board, then cover cross point area with wax paper.
- cut two extra 1/16″ x 1/16″ sticks, approx 1″, from scrap balsa stick and place them on the wax paper approx 4″ away from center on both sides. (these are simply used as spacers to set the wing on, accuracy of placement is not required)
- Place two stick pins on the horizontal line, one on each side of the center line, approximately 1″ from the spacers. (see picture below)
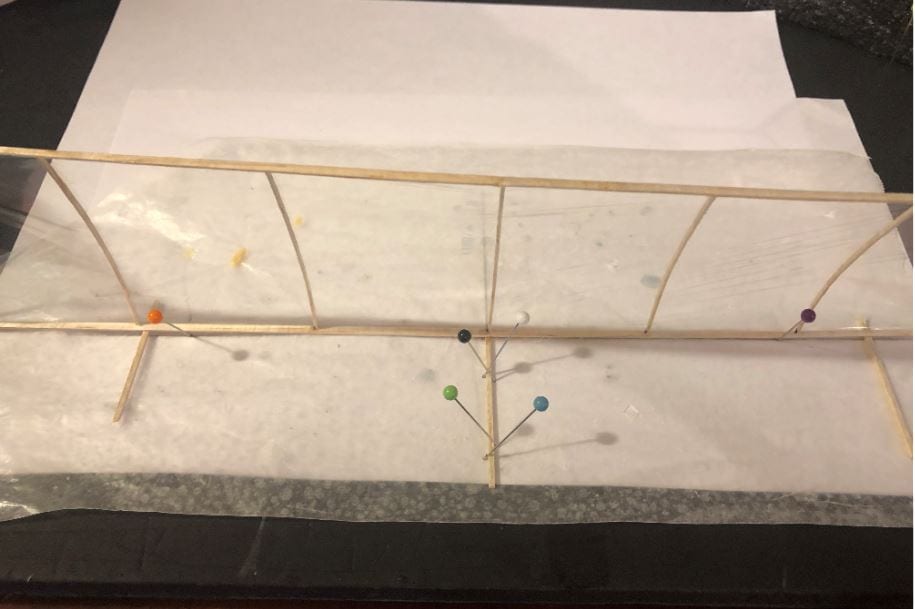
- Pin the front wing-post to the board over the cross over point, with 1/16″ above the horizontal line. DO NOT push pins through the balsa wing posts but rather cross them over the sticks to hold in place.
- Carefully lower the wing, leading edge down, onto the wing post. Center Rib should be lined up with wing post. Note, the stick pins aide in keeping the wing lined up horizontally.
- Once comfortable you have the center of the wing over the wing post, drop a small amount of glue at the joint and let dry.
- REPEAT the above process for the trailing edge / rear wing post.
Now lets build the wing tubes for this F1L-EZB.
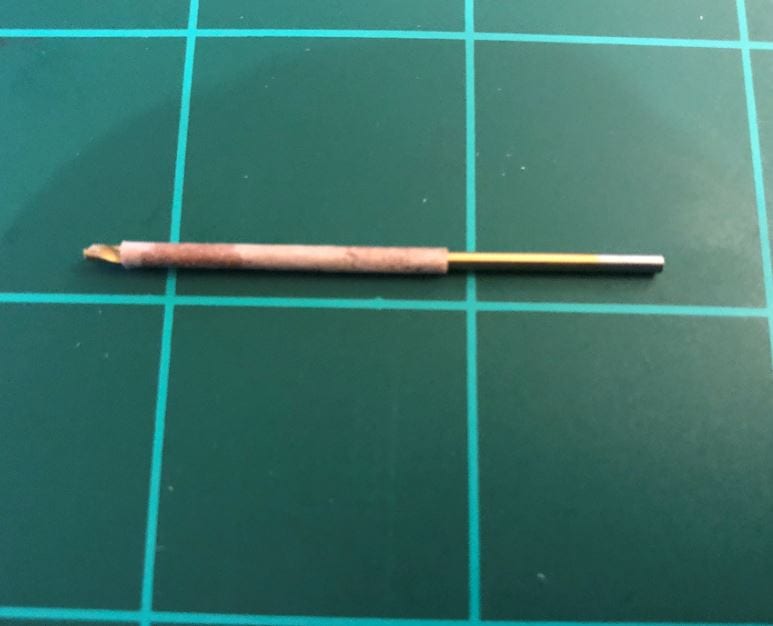
This make take several attempts to get right, so do not get discouraged! It will require a 1″ by 2″ piece of wrapping tissue, a drill bit, some sort of wax, glue and a bit of luck! There are several pictures below that show the progress.
- From gift wrapping tissue, cut a 1″ x 2″ section.
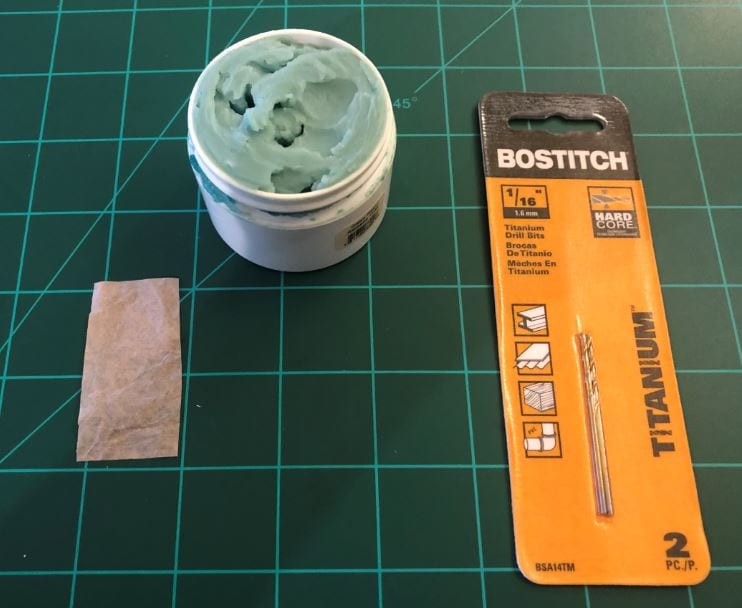
- take a 1/16″ drill bit and generously cover it with any modeling wax or other wax. Special Note: during this build, only one type of drill bit yielded successful results time and time again, without failure, and that is the titanium Bostitch bit shown in the picture and on the Equipment Used List. All other bit types ended up bonding with the tissue and the tube could not be removed.
- Roll the tissue onto the drill bit. Every couple of rotations, put several drops of glue (medium CA used in this build) and let the glue spread through out. Continue rolling for at least 6 complete rotations. Finish with glue, let dry and then trim off the excess length.
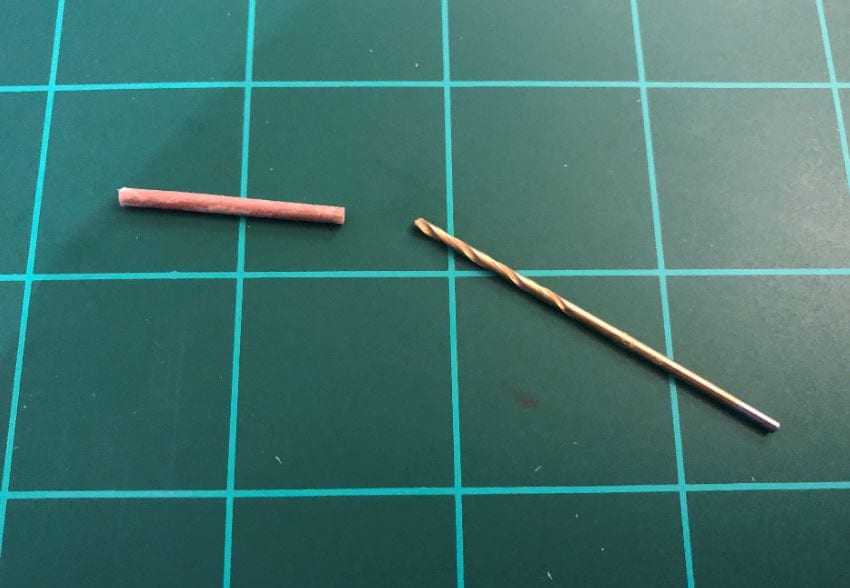
- Once completely dry, gently rotate the tubing off the drill bit in a corkscrew type fashion. (which is how the drill bit will want to come off naturally).
- Set aside the tube until final assembly.

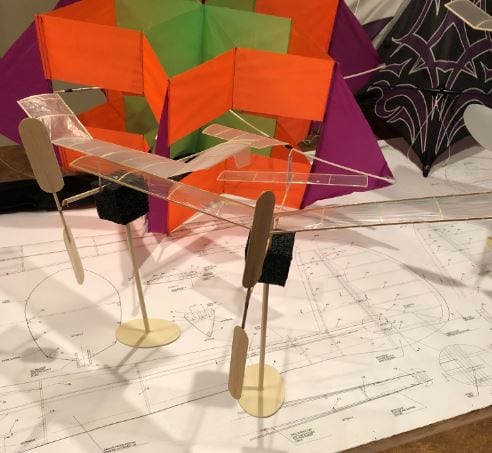
Building the Prop of the Indoor Free Flight Model
Building the prop is a several step process including cutting the blades, fabricating the prop hub and then attaching the blades to the hub.
Cutting The Blades for this F1L-EZB
- From Standard 8.5″ x 11″ Card Stock, print out template “Prop Blades.pdf” and cut out the Blade A Template. Note: as new blades are designed and tested, this template will be updated to reflect.
- From 1/32″ balsa sheet stock and using the Blade Template, cut out 2 blades.
- with them together, lightly sand the edges.
- Carefully sand each side of the blades to remove mass / weight. This is an area that as you build up your skills, you will want to pay close attention to.
Fabricating the Prop Hub
- Find the Prop Hub section on the Profiles drawing and then cut a 1/8″ x 1/8″ x 4″ stick that matches. This will form the basis of the prop hub.
- Using a fine tip marker, Mark the prop hub stick in 3 locations. 1″ from each end and also in the center.
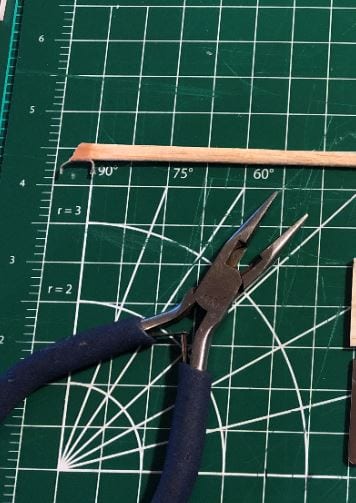
- Carefully (very carefully) push a stick pin through the center. Make sure it starts in the center and exits on the other side, in the center. (see picture below)
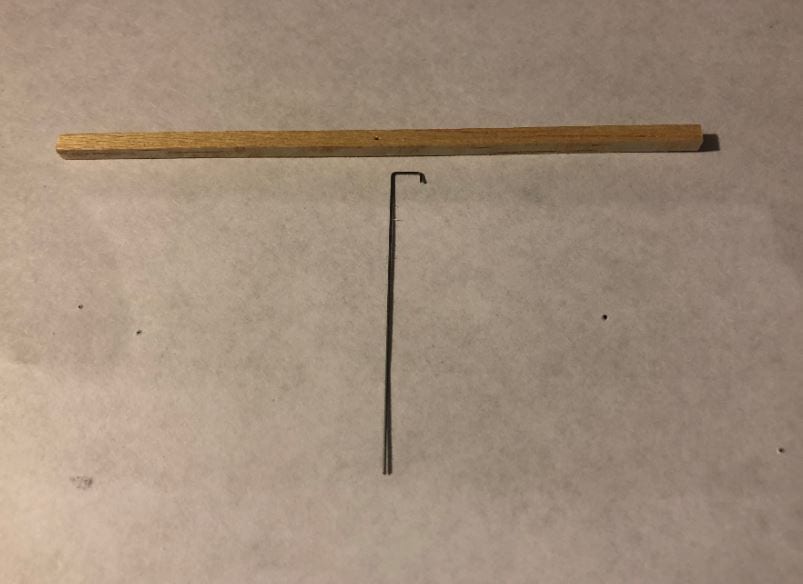
- Start with a 2″ length of 0.015 Piano Wire and bend (using needle nose pliers) the top portion to match the picture below titled “Piano Wire bent and ready to push through Prop Hub”.
- Carefully push the straight end of the piano wire through until the slight hook on the other side gently embeds into the balsa wood stick.
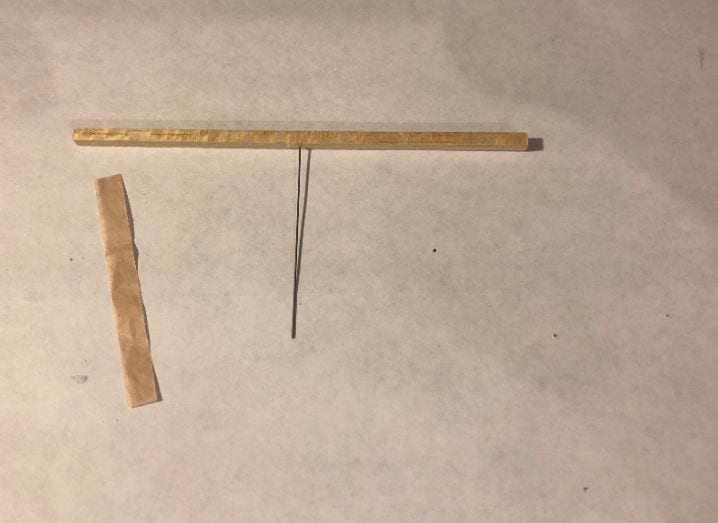
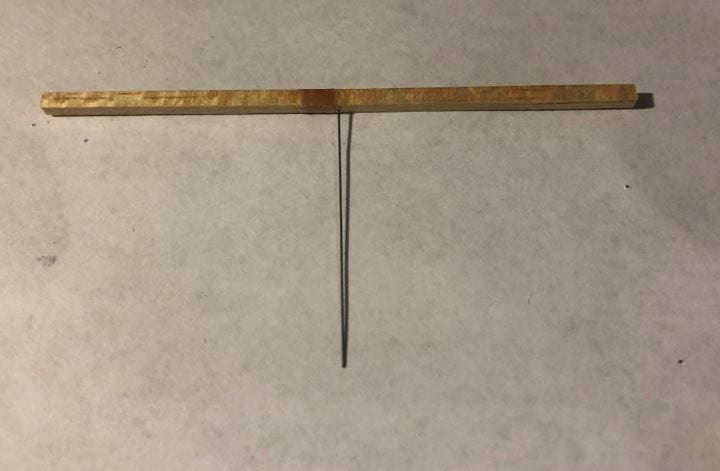
- From the gift tissue, cut a 2″ x 1/4″ strip and, using glue sparingly, wrap the center section to strengthen the center area. 2 wraps around will suffice. Trim off excess. (see picture below)
- From a distance of 1″, create a loop using the needle nose pliers and trim excess wire.
- The Prop Hub is ready for the next step, adding the blades.
Adding Blades to Prop Hub
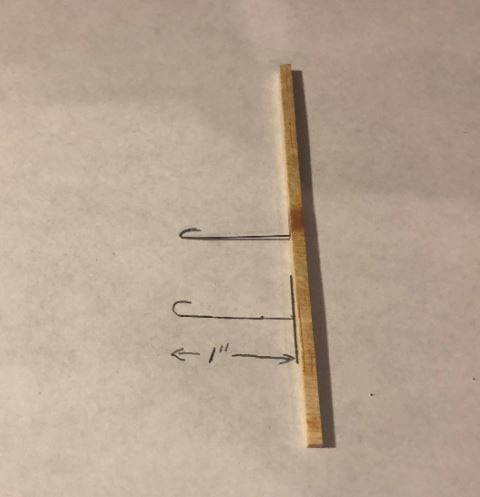
These next few steps can be confusing, please reference the next two pictures and the Prop Hub Side View Detail on the Profile drawing. Special Note, when you are removing balsa from each end of the Prop Hub, BE VERY GENTLE!
- On one end of the Prop Hub, gently remove balsa from corner to corner. Recommend starting, with knife, at the 1″ mark and carefully remove balsa towards the end. Do not ‘notch’ the balsa stick at the 1″ mark because it weakens the area. Take your time!
- Now, change ends and repeat the process. Refer to the drawing and the pictures often.
- Carefully glue the blades on, sitting each on in the flat space you just created by removing balsa wood on each end. (See picture below)
Fuselage Assembly of this Indoor Free Flight Model
The fuselage is fabricated in two different pieces. The motor stick, which holds the rubber band and the tail boom, which holds the fin and stabilizer.
Note: All build techniques needed for these two assemblies have been done before, so detailed instructions and pictures will not be required. High Level Instructions and pictures are provided next.
Motor Stick
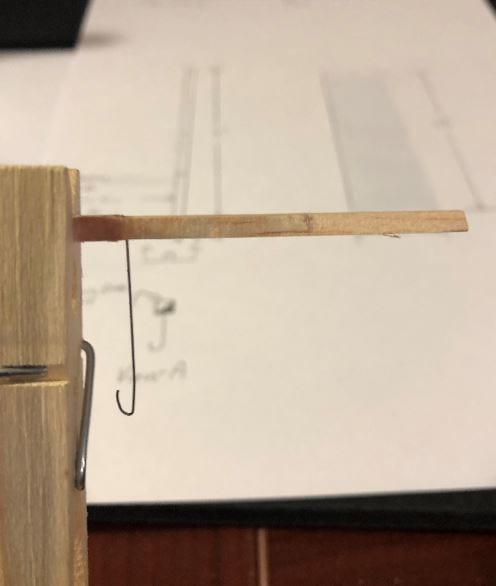
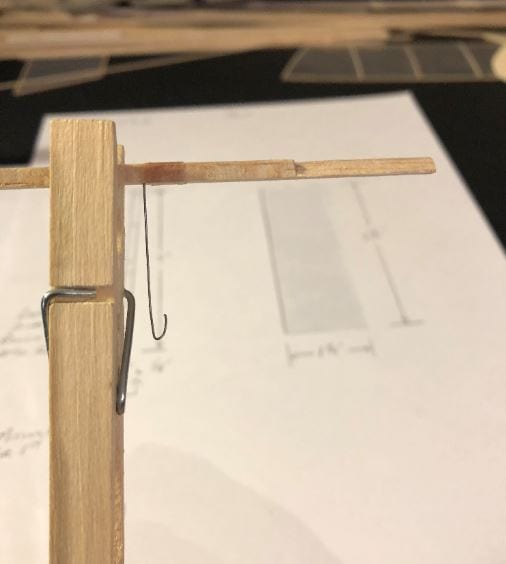
The motor stick is a 10″ piece of balsa which holds the bearing on the front and the rubber band “motor” hook on the back. Each are strengthened by tissue wrapping.
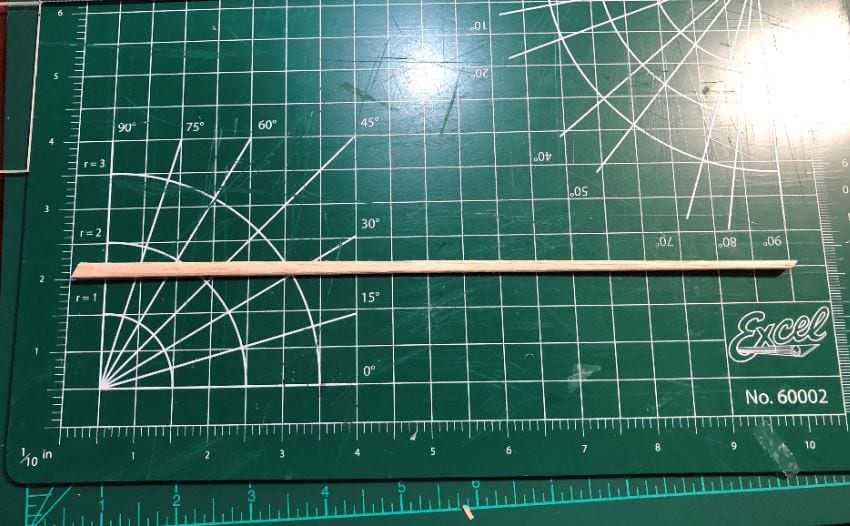
- Cut a 1/4″ by 10″ stick from a 1/8″ sheet. Taper the cut slightly to end around 1/16″ or greater on the rear edge. (see Profile Drawing)
- Cut an approximate 67 degree angle on the front of the stick and a 45 degree cut on the rear of the stick. (See Profile Drawing)
- Sand carefully and round the edges.
- Bend a 2″ piece of 0.015 piano wire per Profile Drawing, insert into the rear of the stick at 1/2″ from the end. Wrap it with a 1/2″ x 2″ piece of tissue as you did with the Prop Hub and secure with glue. Finish forming the hook per the drawing and trim off the excess.
- Flip the motor stick upside down and carefully glue the bearing. (see drawing and pictures). Slightly angle it (1 degree or so) as seen in Bearing View on the Profile Drawing. Secure it with another 1/2″ x 2″ tissue.

Motor Stick is ready!
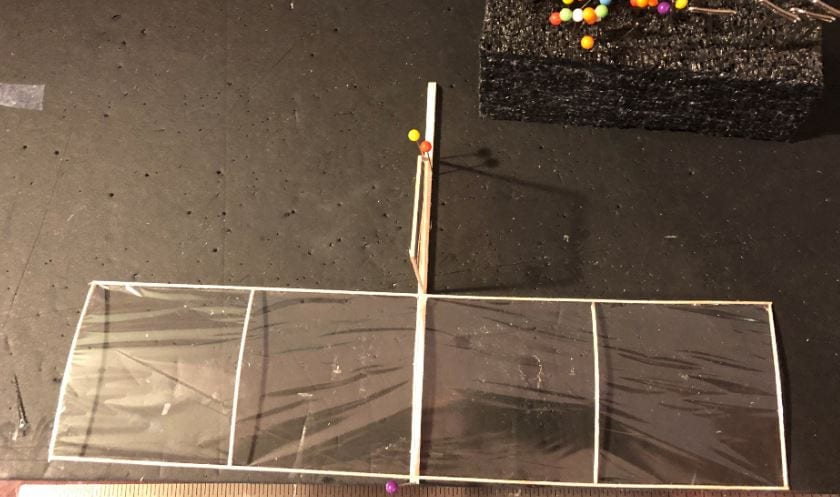
Tail Boom Assembly
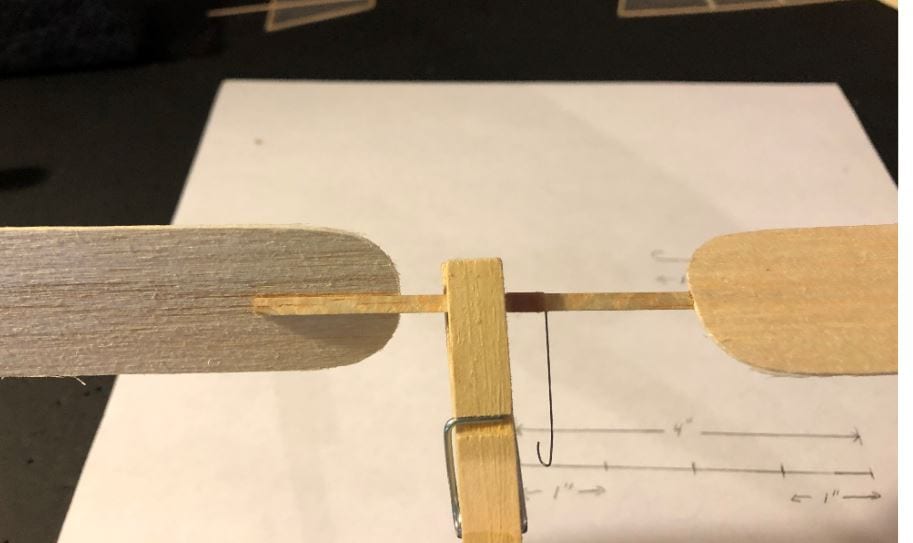
- The Tail Boom Stick is simply a 1/16″ x 1/16″ by 6″ balsa stick, with a 45 degree angle cut on one side to mate with Motor Stick. See Profile drawing, cut to match.
- Secure the Tail Boom Stick onto your work surface with a few push pins on each side.
- Practice laying the finished stabilizer on the rear edge and leveling it with scrap balsa. Remember the stabilizer has a leading and trailing edge, so make sure you have the leading edge facing forward. Once comfortable, glue in place with a couple drops of medium CA.
- Practice placing the finished fin in place in front of the stabilizer. It should be at 90 degrees to the stabilizer and slightly to the left (1 degree or so) at the rear. Once comfortable, glue in place. (See Fin Top View on Profile drawing).
Motor Stick to Tail Boom Assembly
Assembling the F1L-EZB Motor Stick to the Tail Boom Assembly, like everything-else, requires patience, practice and a gentle touch. A gentle touch is a requirement for mastering the art of Indoor Free Flight Modeling.
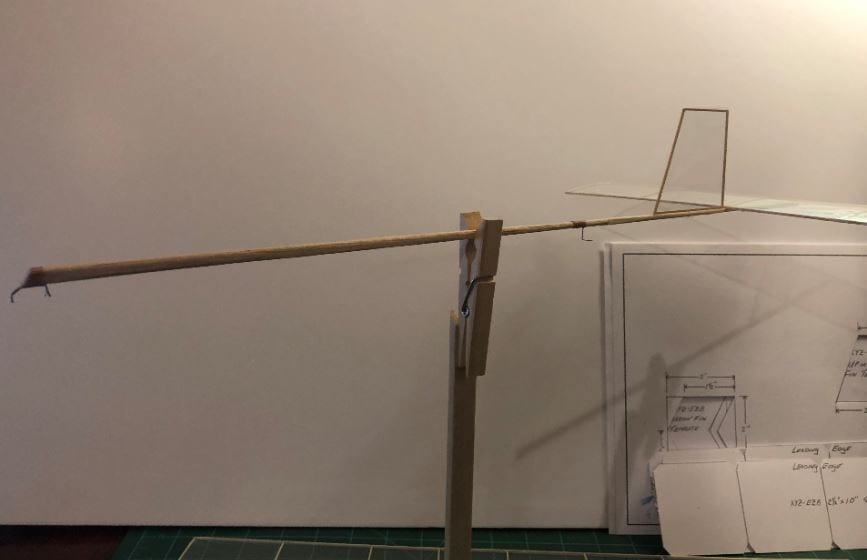
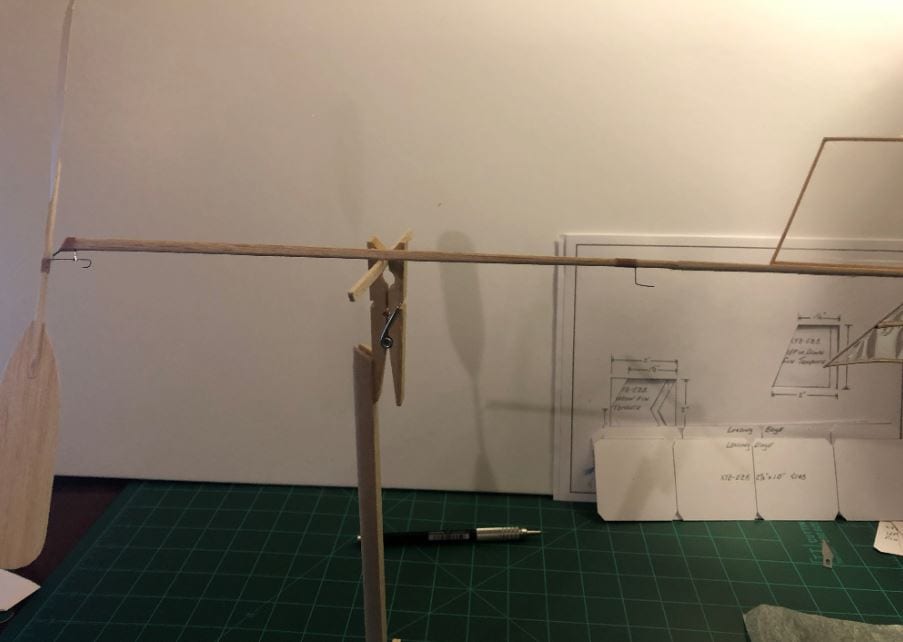
- Fabricate from scratch balsa stick and a clothes pin, a stand that can hold the Tail Boom Assembly. (See picture below)
- Hold the Motor Stick and practice keeping it in place where it lines up with the Tail Boom Assembly. When you are comfortable everything is in alignment, glue it in place with medium CA. Special Note: the finished indoor free flight model will have the stabilizer left side slightly higher than the right side, encouraging the model to fly in a left turn. Since the balsa is very thin in this area, it has been found that in final trimming, manipulating the balsa with water will allow you to get it trimmed as needed. No need to set it in this step.
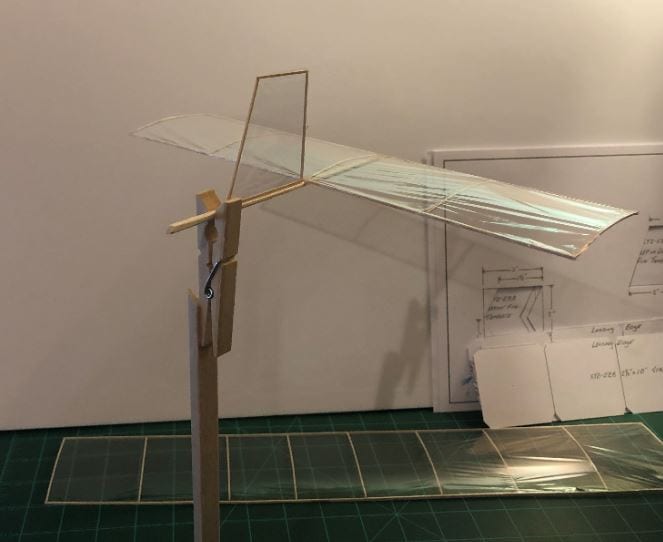
F1L-EZB Fuselage is Complete!
Final Assembly
Final Assembly of this F1L-EZB is very straight forward. you will first set the Center of Gravity and then attached the wings to the motor stick, via the wing post tubes.
Setting Center of Gravity
To set the center of gravity with these delicate indoor free flight models, its easiest to find the CG on the completed fuselage with Prop Assembly attached (no rubber-band), rather than mount the wing in a predetermined position and then final balance everything with additional weight. We do not want to add weight to balance this model if we do not have to!
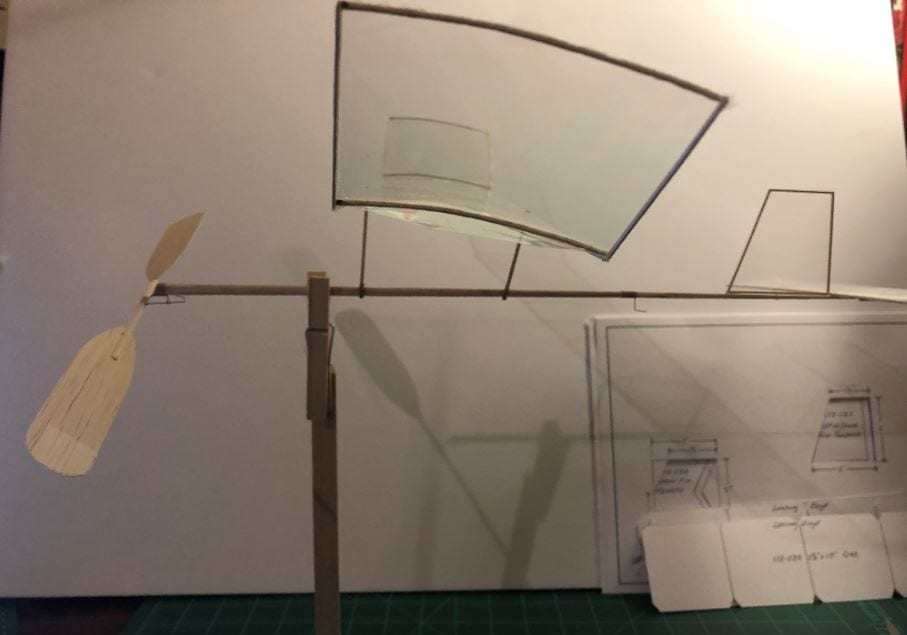
- Carefully install the Prop Assembly through the bearing. This takes practice the first time and it always requires you to be extremely gentle. Make sure the piano wire hook is turning smoothly and resting comfortably in the complete bearing.
- On the Clothes Pin jig you built earlier, setup a balance point and place the fuselage assembly on it. Carefully move it until it balances out and place a mark via a sharpie or pencil, where the balance point is.
- Now take your completed Wing and your complete Wing Post Tissue tube and cut the tube so you have two tubes, approximately 1/4″ long each.
- VERY VERY CAREFULLY push one tissue tube onto each wing post. These will fit snug, but you will be able to remove them.
- Referencing the Profile drawing for the proper location of the Center of Gravity, practice placing the wing assembly onto the fuselage with just the tubes touching the motor stick. When comfortable you can hold the wing in the proper position relative to the CG, place a drop of medium CA on each tube. DO NOT get any glue in the tube.
- Once dry, verify you can remove the wing and put it back fairly easy.
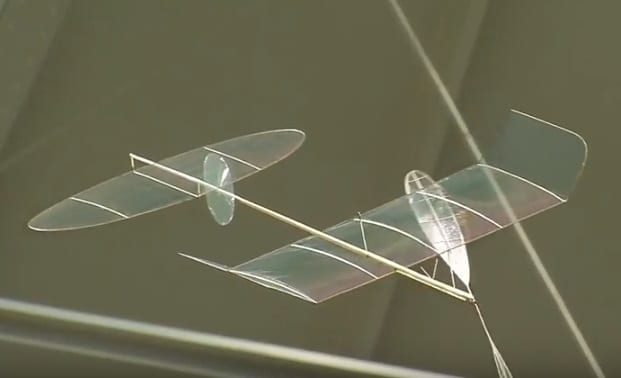
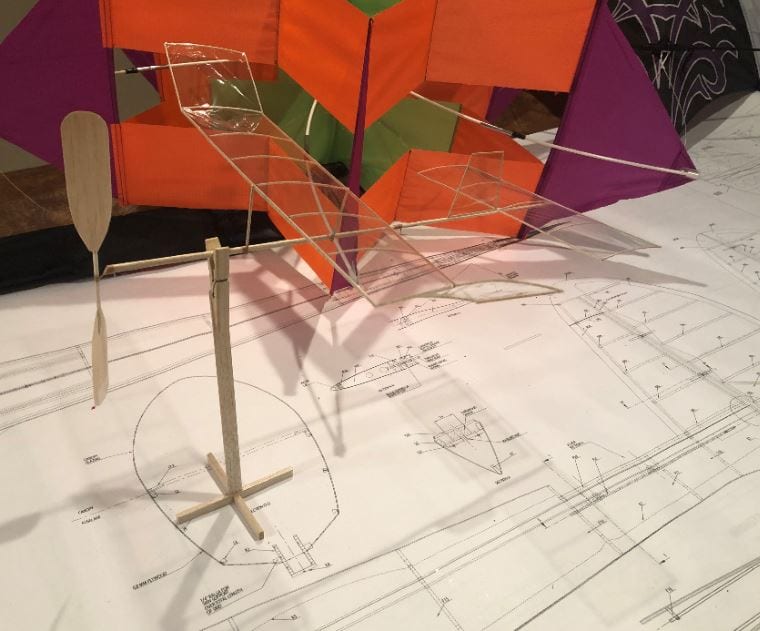
CONGRATULATIONS, The F1L-EZB, aka our XYZ-EZB is complete and ready to be trimmed and flown!! Watching these Indoor Free Flight Models fly is incredible!
The Rubber Band
The rubber band, or motor, for any Indoor Free Flight Flyer is a topic that deserves its own page and the F1L-EZB is no different. This page is under development now.